Turn a cheap Linnmon‑ADILS combo into a rock‑solid gaming hub by swapping the tabletop for a Karlby veneer, adding two Alex drawers for weight support, and reinforcing the legs with Finnvard or metal brackets. Mount heavy monitors on a plywood‑backed arm, use L‑brackets for load distribution, and hide power strips in a Signum tray. Clip Tenmiro RGB strips under the edge for ambient glow, and pair wireless Audioengine speakers with a headset stand to keep the surface tidy. Keep reading to discover the full set of seven hacks.
Build a Sturdy IKEA Gaming Desk Base
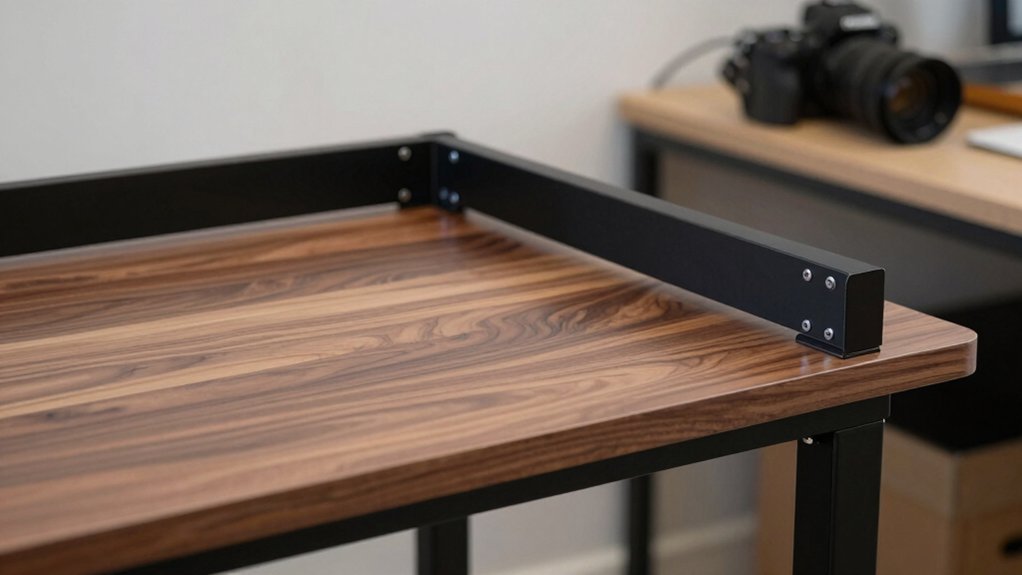
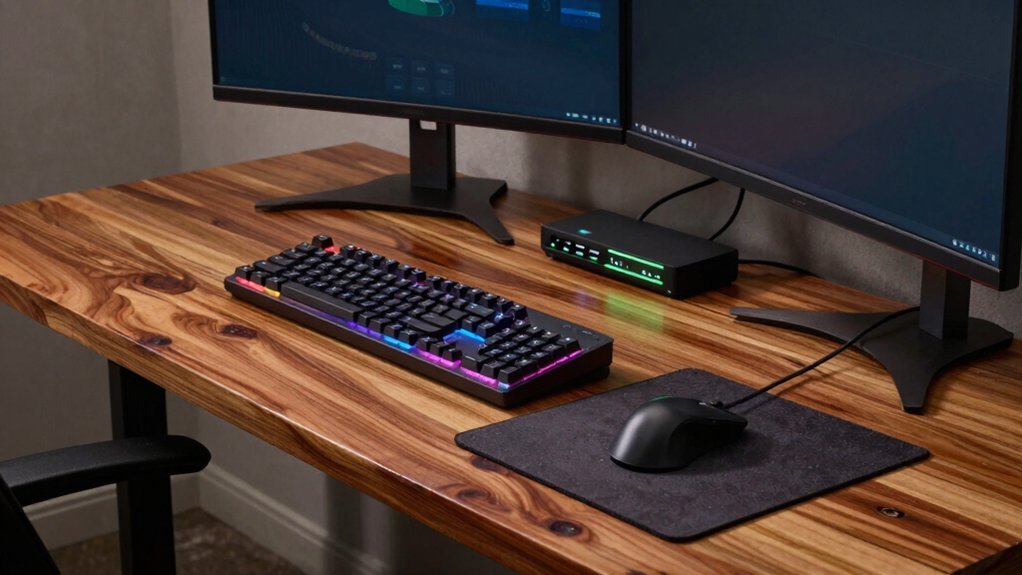
One solid way to start a sturdy IKEA gaming desk is to combine a Linnmon desktop with four ADILS legs—about $46 total. You’ll appreciate the low price, but the honey‑comb top isn’t ideal for heavy monitor mounts, so you should treat this base as a platform for future upgrades. Add an under‑desk support bar or reinforce the corners with metal brackets; those simple IKEA hacks boost sturdiness without breaking the bank.
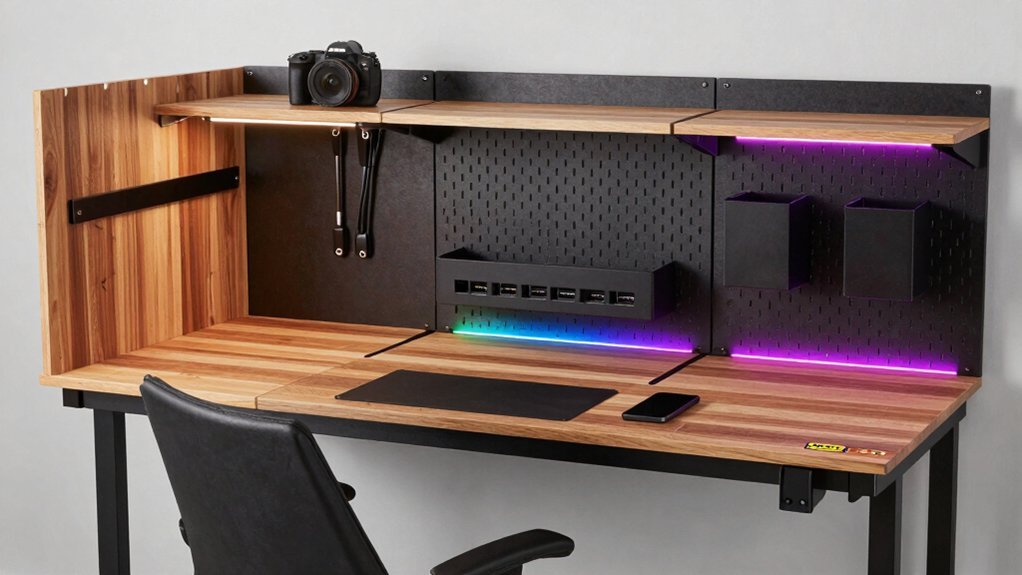
When you need more rigidity, swap the Linnmon for a Karlby veneer top and pair it with two Alex drawers or a single Alex drawer plus Finnvard trestle legs. That mid‑range build costs roughly $384, delivering a solid gaming desk that can handle heavier gear and still look sleek. Anti-static/ESD considerations for cable routing and component protection can further safeguard electronics in a gaming setup, especially if you’re integrating power strips or modular components under the desk.
Reinforce Your IKEA Desk for Heavy‑Duty Monitor Mounts
If you plan to mount a heavy‑duty arm on a hollow honeycomb Linnmon, you’ll need to reinforce the desk at the mounting points to keep it from flexing or failing. First, add a plywood reinforcement strip (¾‑in thick) under the mount, securing it with short wood screws. Next, attach a metal L‑bracket to each leg to improve load distribution. For even sturdier support, place a Besta shelf with Capita legs beneath the arm, turning the hollow desk into a solid platform. Finally, consider swapping one ADIL leg for a Finnvard leg to handle heavier monitor mounts without wobble. Strengthened configurations align with the idea that budget risers often emphasize load capacity, ventilation, and easy assembly to support heavier setups safely. Load capacity guides choosing compatible add-ons and reinforcement strategies.
| Step | Material |
|---|---|
| 1 | ¾‑in plywood |
| 2 | Metal L‑bracket |
| 3 | Besta shelf + Capita legs |
| 4 | Finnvard leg replacement |
Tame the Tangle: Essential Cable‑Management Tools for Your IKEA Gaming Desk
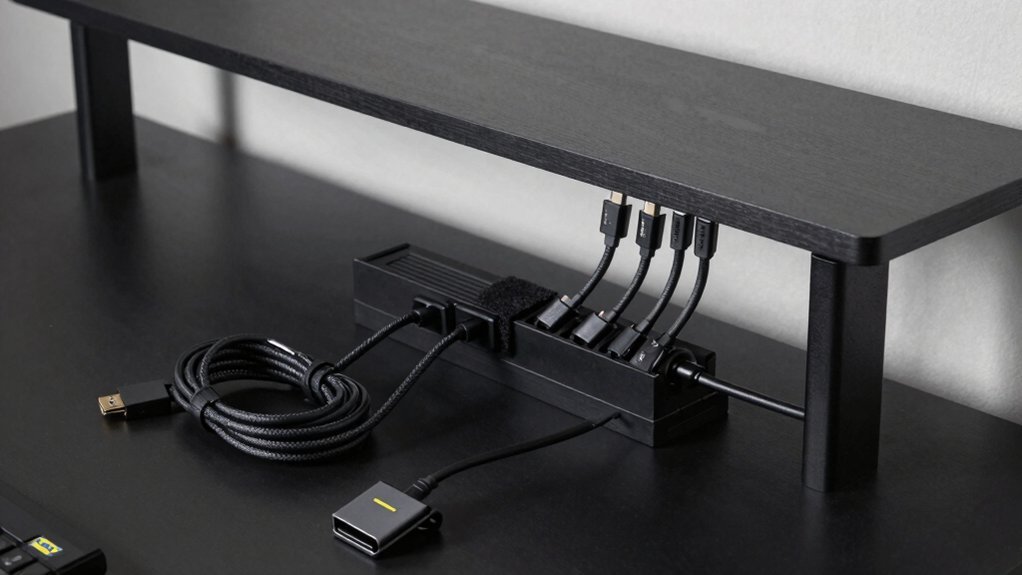
Ever tangled in a mess of cords under your gaming desk? Grab a Signum tray and mount it beneath the surface; it hides power strips, HDMI leads, and USB hubs while keeping them within reach. Add Bjarnum hooks to hang headphones and long cables, freeing desk space for mouse movement. Pair the tray with pegboard accessories like Skadis: you can snap on small bins for adapters or clip‑on holders for Ethernet cords. Flexible cable ties and reusable clips lock wires along the desk edges, preventing accidental pulls. If you elevate your monitor with a Besta‑Capita riser, airflow improves and the under‑desk area stays clear. These simple cable‑management tools turn a tangled nightmare into a tidy, functional gaming station. under-desk organization
Choose the Right Monitor Arm – Vivo Budget vs. Ergotron LX/HX
You’ll find the Vivo mount fits most 23‑27‑inch screens and keeps costs low, but it struggles with heavier or larger displays. IP65 water/dust resistance The Ergotron LX handles up to 25 lb, making it a solid middle ground for 24‑34‑inch monitors.
If you need serious capacity for a big or heavy panel, the HX’s heavy‑duty design is the safer choice.
Budget “Mounting Compatibility Compatibility
Wondering which monitor arm fits your desk without breaking the bank? You’ll find the Vivo budget arm works fine for 23‑27‑inch panels, especially on solid‑wood IKEA desks, and it stays valid from Nov onward. It’s sleek black, cheap, and hooks into standard VESA, but it can’t bear a 32‑inch or heavier screen. When you need more lift, the Ergotron LX handles up to 25 lb and most widescreen setups, while the HX pushes the limit to 49‑inch, heavyweight monitors. Pair any arm with a reliable power strip to keep cables tidy and power stable. Real‑world constraints like latency and range considerations from Bluetooth/AV setups remind us to match performance needs with gear capabilities Low Latency and dual‑mode versatility to ensure synchronized audiovisual workflows.
Ergotron Heavy‑Duty Capacity
Looking for a monitor arm that truly handles heavy, large‑screen setups? The Ergotron LX works great for most single‑monitor rigs up to about 25 lb, but when you push toward 49‑inch or heavier panels, the HX steps in with higher weight and size capacity. The budget‑friendly Vivo mount appears in many IKEA desk photos, yet it struggles with very large or heavy screens and lacks the smooth gas‑lift action of Ergotron’s premium arms. Gas‑lift mechanisms give you smoother, higher lifts and finer adjustments, which matters for gaming rigs that need precise positioning. If your monitor stays under 25 lb, the LX offers solid performance at a reasonable price. Choose the HX when you need extra duty‑cycle strength, especially for 30‑plus‑pound, ultra‑wide displays. Independent port protection and auto‑shutoff also help safeguard gear in multi‑device setups, a concept echoed by GaN hubs that manage heat and power efficiently. Gas‑lift advantages matter for long gaming sessions and dynamic repositioning.
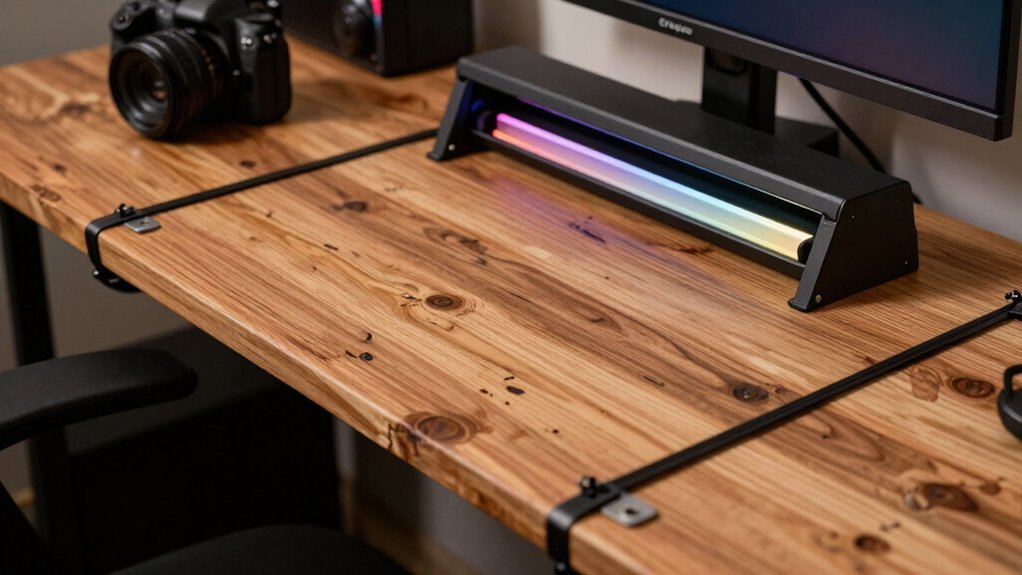
Add Tenmiro RGB Strips to Your IKEA Gaming Desk for Ambient Glow
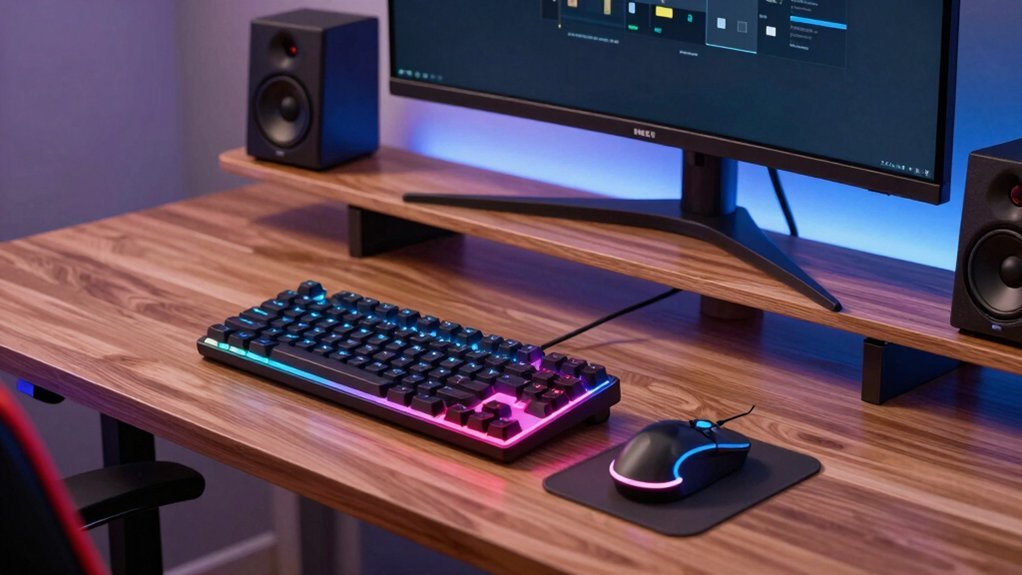
You can snap the Tenmiro strips under the monitor or along the desk edge for an even glow that won’t clutter your setup. For deeper integration, you can also sync the colors to your gaming rig via the app so the lighting reacts to your game’s mood, and use a Govee Home App-compatible setup for multi-device synchronization with the rest of your gear by leveraging its ecosystem RGBIC technology.
Easy Placement Tips
Where should you mount Tenmiro RGB strips for the best ambient glow? Slip the strip along the back edge of the tabletop, just under the lip, so light spills upward without exposing cables. If you prefer a stronger backlight, tuck it behind the monitor’s stand, aligning the strip with the screen’s bottom edge. Keep the strip flat against the desk surface; a thin adhesive backing prevents sagging and ensures even illumination. Avoid placing it on the desk’s front edge, where glare can spill onto the screen. Use the included mounting clips to secure corners and prevent movement when you adjust the monitor. This positioning maximizes atmospheric light, enhances contrast, and keeps your setup tidy.
Power Supply Options
When you power Tenmiro RGB strips, the simplest route is a USB‑C wall adapter that plugs directly into a nearby outlet, keeping the desk clean and the cables short. Choose an adapter rated for at least 2 A to avoid dimming when you crank up brightness.
If you prefer a hidden source, mount a small power brick under the desk and run a short USB‑C cable to the strip’s controller. For longer runs, use a 5 V, 3 A supply and a thin, flexible conduit to keep the cord out of sight.
Ensure the power source is on a surge‑protected strip to protect both the LEDs and your equipment. Proper routing and a snug connection will give you a steady ambient glow without clutter.
Sync With Gaming Gear
Powering the Tenmiro strips with a compact USB‑C adapter already gives you a clean glow, now tie that light to your gear for a unified vibe. Clip the strip behind your monitor, then connect its controller to your keyboard’s USB‑C port so the colors shift whenever you change a lighting preset. Use the same controller for your mouse pad and headset stand, linking them through the Tenmiro app or a compatible motherboard RGB hub. This sync lets your desk pulse in rhythm with in, creating an immersive backdrop that feels intentional rather than tacked‑on. Because the strips sit along the tabletop edge, they diffuse evenly without cluttering the surface, preserving the IKEA aesthetic while boosting visual impact. The result is a cohesive, affordable glow that enhances both style and gaming immersion.
Boost Audio Clean Clutter With Audioengine A2/A2+ Speakers and a Wireless Headset Stand
Looking to keep your gaming desk sleek while delivering rich sound? Grab the Audioengine A2 or A2+ speakers—they’re tiny, come in black, white, or red, and blend into any IKEA setup without stealing space. Choose the wireless version for a cable‑free surface, letting you position them wherever the sound feels right.
Pair them with a wireless headset stand; it holds your headset upright, stops cords from spiraling, and frees up valuable real estate. The stand’s minimal profile matches the speakers’ clean lines, creating a unified look.
Together, they cut visible wires, keep your gear organized, and let you enjoy crisp audio without sacrificing the minimalist vibe of your DIY gaming desk.
Upgrade to a Karlby Worktop With Alex Drawers for Heavy‑Duty Gaming Rigs
Why settle for a wobbly desk when you can boost rigidity with a Karlby worktop and two Alex drawers? The Karlby’s thicker veneer adds stiffness, letting you mount heavy monitor arms and gear without flex.
Pairing it with two Alex drawers gives you sturdy, low‑profile storage that balances the surface and keeps cables tidy. At roughly $384 / £230 / A$490, this mid‑range upgrade costs about three times a budget Linnmon setup but pays off in durability and a capability. The drawers slide smoothly, supporting weight while the worktop resists warping under intense gaming sessions.
If you need extra leg support, consider swapping one drawer for a Finnvard Trestle leg, but the two‑drawer combo already delivers a solid, heavy‑duty foundation for any rig.
Frequently Asked Questions
Can I Add a Built‑In Power Strip Without Compromising Desk Stability?
Yes, you can add a built‑in power strip and keep the desk stable—just reinforce the mounting area with a metal bracket, secure it with screws, and distribute the weight evenly across the frame.
What Weight Limit Should I Consider for a DIY Metal Reinforcement Frame?
You should aim for a 150‑200 lb (68‑90 kg) limit; design the metal frame to support at least that much, adding extra cross‑bars if you plan to load heavier monitors or equipment.
How Do I Protect the Desk Surface From RGB Strip Heat?
You protect the desk surface by mounting the RGB strip on a thin metal or acrylic spacer, adding heat‑resistant tape underneath, and sealing the edges with silicone to disperse any warmth.
Is There a Way to Mount a Headset Stand Without Drilling the Tabletop?
Yes, you can mount a headset stand using adhesive‑backed clamps or a suction‑cup base that sticks to the desk, or slide a small metal bracket into an existing groove, avoiding any drilling.
Can I Integrate a Monitor‑Arm Cable‑Channel Into a Pre‑Drilled IKEA Hole?
Yes, you can slide a monitor‑arm cable‑channel into a pre‑drilled IKEA hole; just trim the channel to fit, insert it, and secure it with adhesive or a small screw for a clean look.
In Summary
You’ve turned a cheap IKEA set into a sturdy, cable‑clean, RGB‑lit gaming command center that can hold heavy monitors, crisp audio, and all your gear. By reinforcing the frame, adding a solid monitor arm, and installing smart lighting and speaker stands, you’ve created a personalized, high‑performance desk without breaking the bank. Enjoy the sleek setup and focus on the game—your upgraded workspace is ready for anything.
Leave a Reply