Plan your routes before installing anything; map power and data paths along case edges or behind the motherboard tray and measure just enough slack. Choose a case with large, labeled grommets and cutouts, then feed cables through the rubberized grommets to protect wear. Keep most wires behind the tray, bundle related cables, and secure them with zip ties or Velcro straps. Trim excess lengths, use low‑cost sleeves or combs for neat spacing, and hide front‑panel cords in a raceway or cable box. Leverage a modular PSU shroud to tuck unused leads, label each cable on both ends, and do a final airflow check before the first boot—more details await if you keep going.
Plan Your Cable‑Management Layout Before Installing Components

Ever wonder how a tidy build starts before you even touch a screw? You begin with cable management by visualizing airflow and mapping a path for power and data cables along case edges or behind the motherboard tray.
Layout planning means measuring lengths so you have just enough slack—no excess loops or kinks. Identify cutouts, grommets, and built‑in channels, then design cable routing around them.
Group related cables—PSU, motherboard power, front‑panel, storage—so they stay together and avoid crossing. Leave clear pockets and tie‑down points for future upgrades, preventing rework later. Incorporating a mix of magnetic and adhesive clips can help secure cables along edges and surfaces while keeping options flexible for future changes cable clip types.
Select the Right Case Grommets and Cutouts for Clean Routing
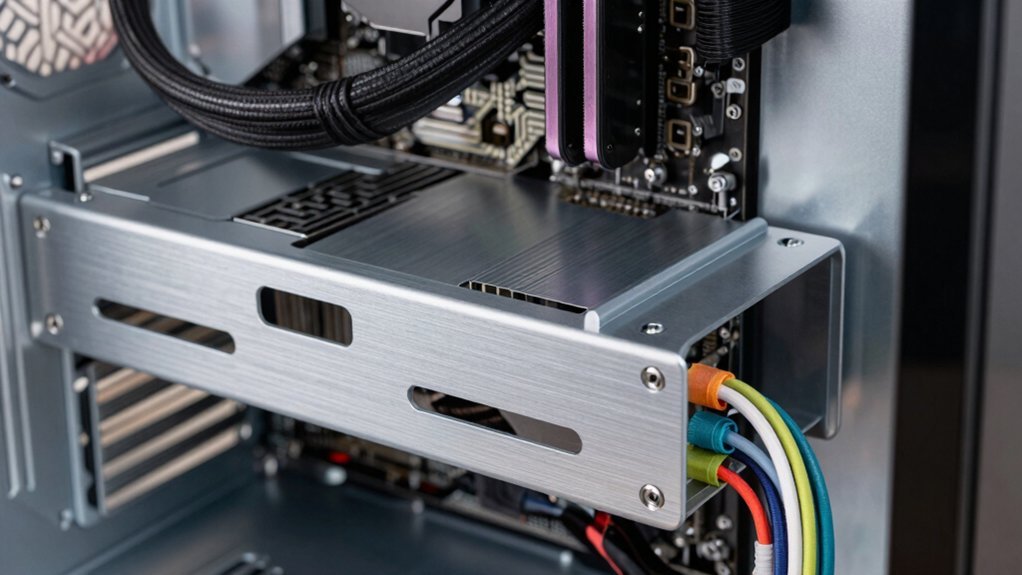
How do you guarantee cables glide smoothly without snagging on sharp edges? Pick a case with large, clearly labeled grommets and multiple backside cutouts. Those features let you thread power, front‑panel, and data cables through rubberized grommets, protecting them from wear. Align your cable routing with existing cutouts to avoid tight bends, and choose removable or hinged panel cutouts that expose the grommets for easy adjustments without pulling the motherboard out. Properly matching grommets to cable types can further reduce wear on jackets and shields protective padding during routing. – Use oversized, rubberized grommets for high‑traffic cables.
Large, clearly labeled grommets and removable panel cutouts ensure cables glide smoothly without snagging.
- Prioritize cases with removable panel cutouts that reveal grommets.
- Follow dedicated routing channels or a rear cable tray to keep bundles hidden.
Route Cables Behind the Motherboard Tray to Preserve Airflow
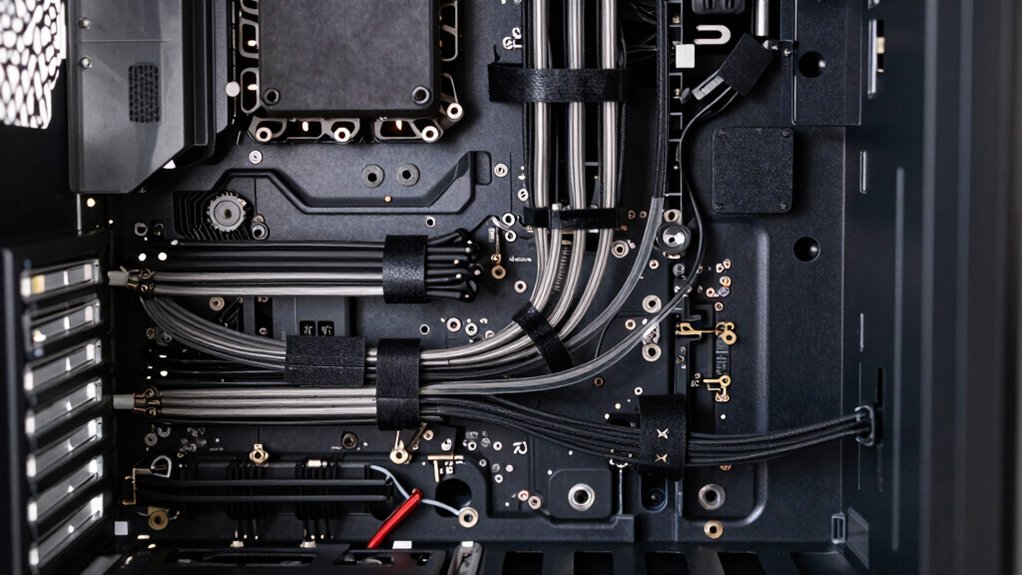
You’ll keep the grommets clean by feeding cables through the tray cutouts, then secure them with cable ties so they stay tidy. Regularly inspect the USB-C power delivery ports on your surge protector strips to ensure none are overloaded during long gaming sessions USB-C Power Delivery. Make sure each bend stays smooth, avoiding sharp kinks that could wear insulation or cause interference.
Finally, bundle related wires together and attach them to the rear mounting points to preserve unobstructed airflow over your CPU cooler and GPU.
Keep Grom G
When you route most cables behind the motherboard tray, the front of the case stays clear, letting air flow unimpeded. Using grommets and cutouts, you guide each wire through the panel, avoiding sharp bends that could choke airflow. Prioritize behind-the-tray routing for power and data cables; this keeps interior space open for intake and exhaust paths. Plan your bundles around fan and radiator mounts, then secure them with Velcro straps so they stay put and don’t snag components.
- Align cables with case grommets to protect insulation and maintain smooth airflow.
- Keep all major bundles behind-the-tray to reduce visual clutter and improve cooling efficiency.
- Use simple Velcro straps for cable management, ensuring bundles stay tidy and stationary.
Efficient airflow setup helps maximize cooling performance without adding complexity to your build.
Use Cable Ties
Routing cables behind the motherboard tray keeps the front of the case open for optimal airflow, and securing those hidden bundles with cable ties or Velcro straps locks everything in place. You’ll want to plan each path so it hugs the tray’s edge, avoiding sharp bends that could choke airflow. Grab a few cable ties and group power, SATA, and front‑panel leads together, then snap them to the grommets or cable channels along the back panel. Velcro straps work well for larger bundles you might need to adjust later. After you’ve tied everything down, give the interior a quick visual check—no loose ends, no protruding ties that could snag connectors during upgrades. This simple cable management step keeps your rig tidy and your cooling efficient. Cord management kits can provide modular solutions like sleeves, clips, and trays that help extend organization across a full setup.
Maintain Smooth Curves
Even if you think the motherboard tray is just a metal sheet, it’s actually the key to keeping your airflow unblocked; by guiding most cables behind it, you create a clear front‑to‑back passage for air. Good cable management hinges on smooth curves, so avoid sharp bends that create turbulence. Use the tray’s routing holes and keep every bundle gentle, then secure them with zip ties, Velcro straps, or cable combs. Planning length cuts slack that could press against fans or components, preserving consistent airflow. Finally, double‑check that nothing behind‑the‑tray routing interferes with PCIe slots, RAM, or heatsinks. Rotating Kiosk iPad Stand offers sturdy cable management and a quick-release option that can help keep peripherals neatly organized during gameplay.
- Use the tray’s built‑in cutouts for gentle bends
- Bundle with Velcro or combs to keep curves uniform
- Trim excess length to prevent sagging or fan contact
Secure Cable‑Management Bundles With Zip Ties, Velcro Straps, and Clips
Pick the right fasteners—zip ties for permanent bundles and Velcro straps when you’ll need to re‑route later. Group related cables together and secure them every few inches so they stay neat and don’t shift. Use clips or mounting points on the case frame to anchor the bundles, trimming any slack and keeping runs parallel. Durable, reusable options like Velcro hook-and-loop ties offer adjustable, long-term organization 4,6,8,10 inch sizes for flexible routing
Choose Right Fasteners
Ever wondered how to keep your cables tidy without risking damage? Picking the right fasteners is essential for solid cable management. Use zip ties for permanent bundles, but keep a few reusable Velcro straps handy for sections you’ll adjust later. Route each bundle along case edges or behind the motherboard tray, securing every few inches with clips or ties to stop movement. Separate power and data runs with individual ties to cut interference and keep airflow clear. Remember to avoid over‑tightening; a snug fit reduces vibration, preserves component health, and lets you access everything for upgrades.
- Zip ties for permanent, low‑cost bundles
- Velcro straps for adjustable, reusable sections
- Small clips for extra hold along edges and trays
Organize Bundles Efficiently
How can you keep your cables tidy while still allowing easy tweaks? Start by sorting cables into logical groups—PSU, front panel, data, and fans—then bind each group with the right fastener. Use Velcro straps for bundles you’ll adjust often and zip ties for permanent sections. Space ties evenly and snap clips along case edges or behind the motherboard tray to preserve airflow. Label or color‑code each bundle so future upgrades are painless.
| Fastener | Best Use |
|---|---|
| Velcro | Frequent changes |
| Zip tie | Permanent bundles |
| Clip | Edge routing |
| Anchor | Tray attachment |
These simple cable management steps keep bundles neat, maintain airflow, and make troubleshooting a breeze.
Trim or Replace Over‑Length Cables to Eliminate Slack
Ever wonder why your case looks cluttered despite careful routing? You can fix that by trimming or swapping over‑length cables, keeping cable management tight and eliminating slack. First, measure each cable’s actual path, then add about eight inches for future tweaks. If a PSU or motherboard lead stretches far beyond the tray, replace it with a modular or shorter version. Feed the remaining runs along case edges or behind the tray, cutting excess so bundles stay neat without tight bends or tension.
- Measure, add 8‑inch allowance, then cut back.
- Swap long PSU/motherboard cables for modular, shorter ones.
- Route along edges or behind trays, trimming to a clean length.
Re‑check pathways after upgrades and trim any new excess to preserve tidy routing and airflow.
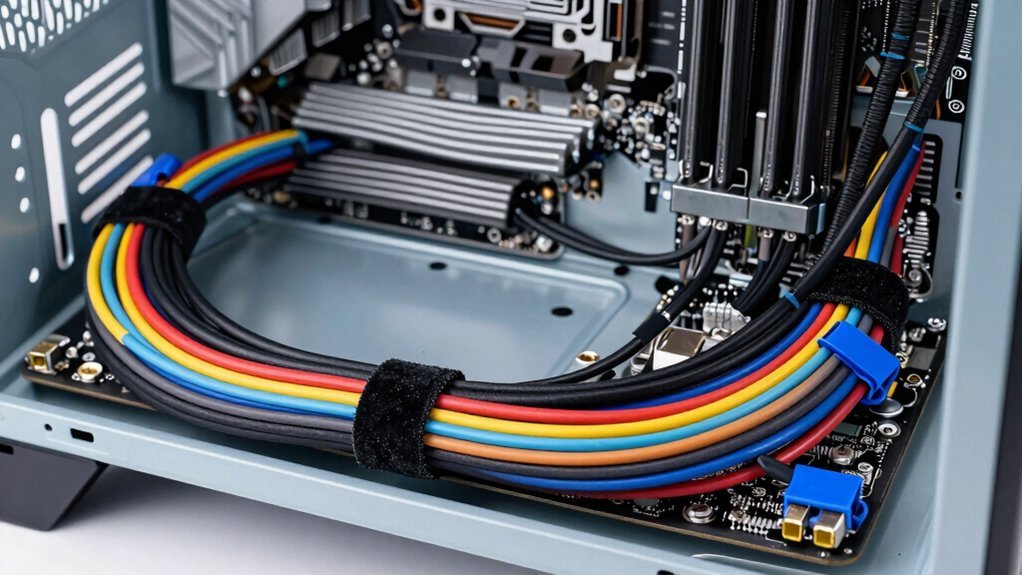
Add Low‑Cost Cable Sleeves or Comb‑Style Organizers for a Uniform Look
Want a clean, professional look without spending a fortune? Grab a few affordable cable sleeves and wrap your power and data bundles in a single, sleek sheath.
Split‑loom or fabric sleeves in black or gray blend with most budget cases, cutting visual clutter while keeping airflow intact.
Pair the sleeves with cheap cable combs behind the motherboard tray; the combs hold each wire evenly spaced and parallel, delivering a tidy, uniform appearance.
Use Velcro straps to secure the sleeves, then you can re‑route or upgrade without cutting anything.
Apply the sleeves and combs along smooth curves, avoiding sharp bends that could restrict air.
This simple cable‑management combo upgrades your build’s aesthetics without breaking the bank.
Hide Front‑Panel Cables With Simple Raceways or a Cable Box
Looking to keep front‑panel cables out of sight without a major remodel? You can tuck them into low‑profile cable raceways or a compact cable box and instantly tidy your desk. First, bundle the front‑panel cables with Velcro straps, then slide the bundle into a desk‑height raceway that runs parallel to the edge. If you have a surge protector, surround it with a cable box to conceal bulky plugs and excess slack. Finally, route any remaining wires through case cutouts or behind the motherboard tray for a seamless look.
- Use under‑desk cable raceways for power, USB, and audio cords.
- Hide surge protector and excess front‑panel cables in a cable box.
- Color‑match or paint raceways to blend with your desk or wall.
Leverage the PSU Shroud and Modular PSU to Reduce Interior Clutter
How can you keep your PC’s interior tidy while boosting airflow? Use a modular PSU and the PSU shroud to hide everything you don’t need. Plug only the essential power leads into the modular PSU, then route the main and motherboard cables through the shroud cutouts. Tuck any slack into the shroud’s dedicated channels or behind it, creating a clean front area. Pair sleeved, color‑matched cables with the shroud for a cohesive look and minimal visible clutter. When you upgrade, detach nonessential cables from the modular PSU and store or remove them behind the shroud. This simple cable management trick reduces interior clutter, improves airflow, and keeps your build looking sharp.
Label Cable Management for Easy Upgrades and Troubleshooting
Ever wondered how a quick label can save you hours when swapping parts? Labeling each cable with a short, unique name—CPU_PWR, GPU_PWR, HDD1—lets you spot its function instantly. Stick a label on both ends of longer cables so you can map connections without guessing. Choose durable, legible tags that survive heat and dust, and keep a simple diagram inside the case or in your build notes. After any upgrade or reroute, re‑label to keep the management system accurate.
- Use color‑coded tags for quick visual cues.
- Write labels with a permanent marker or printed stickers.
- Store a wiring map with the case for future reference.
Final Airflow Check Before First Boot
Now that your cables are clearly labeled and organized, give the airflow a final once‑over before you power on. Check each intake and exhaust fan for clear paths; any radiator should have unobstructed sweep zones. Route power, data, and front‑panel cables behind the motherboard tray or along case edges, using Velcro straps or zip ties to eliminate slack that could snag a fan blade. Make sure PSU cables sit neatly behind the shroud, not bulging into the motherboard area. Verify at least a finger’s width of clearance around AIO tubing and radiator fans. Finally, inspect the rear compartment: bundles should line up evenly, with no sharp edges that could wear sleeving. This quick cable management and airflow audit guarantees a smooth first boot.
Frequently Asked Questions
How Many Zip Ties Should I Use per Bundle?
You should use one zip‑tie per bundle, tightening it just enough to hold the cables together without crushing them. If the bundle feels bulky, add a second tie halfway along for extra support.
Can I Reuse Old Cable Combs From Previous Builds?
Yes, you can reuse old cable combs; just clean them, check for broken teeth, and ensure they still fit your new cables’ thickness. They’ll keep bundles tidy and maintain airflow without extra cost.
Do Cable Sleeves Affect Signal Integrity for USB?
You’ll notice that most cable sleeves are just insulating material, so they don’t alter USB signals. As long as the sleeve isn’t metallic or overly tight, your data integrity stays intact.
Should I Trim PSU Cables or Leave Them at Stock Length?
Leave the PSU cables at stock length unless they’re obstructing airflow or blocking components; trimming can cause strain or poor connections, so only cut excess when you’re sure you can re‑terminate safely.
Is It Safe to Route Power Cables Near the Graphics Card?
Yes, you can safely route power cables near the graphics card as long as you keep a few inches of clearance, avoid sharp bends, and ensure airflow isn’t obstructed by the cables.
In Summary
By planning your layout, using proper grommets, routing behind the tray, and securing bundles with ties or straps, you’ll keep cables tidy and airflow optimal. Trim excess length, hide front‑panel wires, and leverage a modular PSU and shroud to cut clutter. Label everything for quick upgrades and troubleshooting. Give the system a final airflow check before booting, and you’ll enjoy a clean, efficient build that runs cool and looks great.


Leave a Reply