Start by measuring your desk and setting a budget under $100, then pick a compact wide‑angle webcam like the Logitech C960 to stay in frame when you’re close. Add two cheap LED panels at eye level, angled 45° to soften shadows and bounce light off white walls. Use a small wireless lavalier or shotgun mic on a sturdy arm, and set up OBS on a single monitor with a numpad‑style macro deck for quick scene changes. Adjust auto‑exposure, white balance, and audio filters, and you’ll be ready to stream smoothly—more tips follow if you keep going.
Define Your Budget and Space Constraints Up Front

How much space and money do you actually have? Start by measuring your room and noting every inch of desk real. That measurement tells you the maximum camera distance and whether you need a wide‑angle lens to stay in frame.
Measure your space, set a budget, and choose compact gear to fit your tiny streaming setup.
Set a price target—say under $100 for a starter kit—so you can balance cost with essential upgrades like LED lighting.
Prioritize compact gear: a small LED panel, a laptop‑friendly webcam, and a tiny wireless mic fit neatly on a cramped surface.
Draft a space‑planning layout that includes cable routes, wall proximity for bounce lighting, and spots for a mic arm or foot pedals. By defining budget and space constraints up front, you’ll avoid overspending and keep your tiny streaming setup functional and tidy.
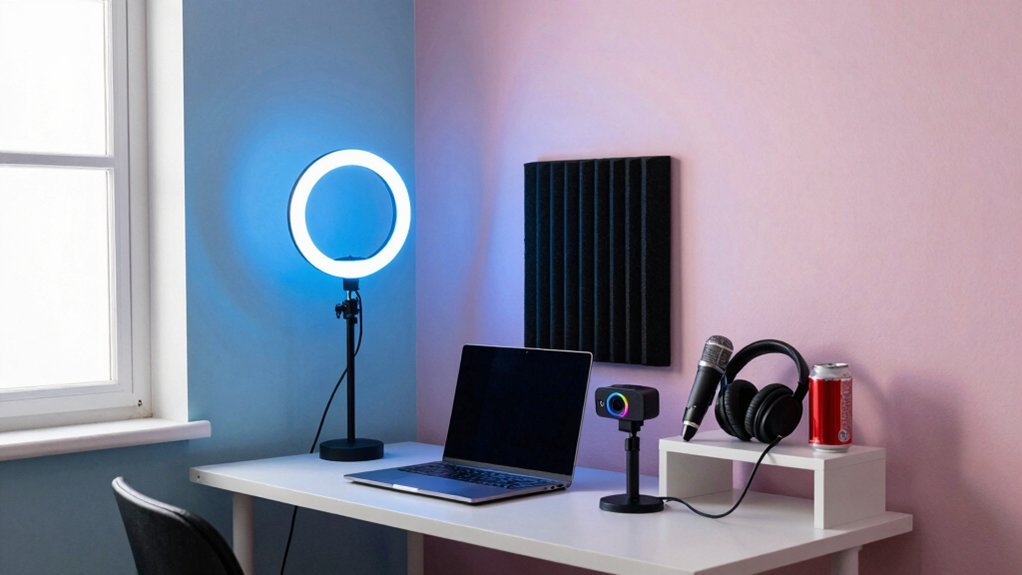
Choose a Compact Webcam for Small‑Space Streaming
When space is tight, a wide‑angle webcam lets you stay close to the camera without losing yourself from the frame. A compact webcam like the Logitech C960 delivers 1080p quality while fitting on a cluttered desk, making it perfect for small‑space streaming. Its built‑in wide‑field lens captures your head and shoulders even when the device sits just a few inches away.
Hook it up, open OBS, and select the 1080p resolution to keep the image crisp; the software’s source naming lets you switch scenes without flicker.
Pair the webcam with two cheap LED panels to tame auto‑exposure and soften shadows. This setup stays affordable, easy to mount, and integrates seamlessly with OBS for a professional‑looking broadcast.
Grab a Wide‑Angle Lens That Fits Your Tiny Desk

You’ll want a wide‑angle lens so you can sit close to the camera without cropping yourself out.
A 20mm‑16mm lens works perfectly in tight rooms, while a 24mm gives a balanced view on full‑frame gear. This lets you keep the framing tight and the background visible, even on a tiny desk. wide-angle capability helps you maximize space efficiency when using budget tripods with compact setups.
Wide Lens for Close‑ups
Ever feel cramped by your tiny desk but still need a clean, full‑body shot? A wide lens lets you sit close while keeping the entire frame in view, so you avoid the dreaded “cut‑off” look. Choose a 24mm for mirrorless cameras; it balances distance and coverage without bulging the budget. If you’re using a webcam, most already offer a sufficient angle for a compact setup, letting you stay within arm’s reach of the mic and lighting. The key is to keep the subject centered and the background uncluttered, ensuring proper framing even when the room feels like a closet. Widest practical backdrop options from affordable kits can help you fit a full background without crowding the desk space 100% wrinkle‑resistant fabric and maintain chroma key stability in tight setups.
20mm‑16mm for Tight Spaces
Wondering how to fit a full‑body shot on a cramped desk? Grab a 16mm15or 20mm) wide‑angle lens and you’ll keep your head and shoulders in frame while the camera sits just inches from the desk. The ultra‑wide view preserves natural perspective, so you don’t have to back up or sacrifice eye‑level framing. Incorporate a compact setup with a small mirrorless body, lightweight tripod, and a pocket‑size microphone to stay out of the way, and consider leveraging a USB‑powered cooling accessory to maintain performance in tight spaces external power. Close‑range framing lets you stay intimate with the audience, and the lens’s short focal length reduces distortion when you position it correctly. Choose a lens that minimizes barrel distortion, and you’ll stream smoothly without off‑framing, even in the tightest rooms.
Why Soft, Even Lighting Is Critical in Tight Rooms
Why does soft, even lighting matter in tight spaces? You’re streaming in a cramped room, and harsh shadows will make your face look flat or over‑exposed on one side. Soft lighting creates a gentle, flattering look, while diffuse illumination spreads evenly across the background, preventing the webcam’s auto‑exposure from hunting for a bright spot. Bounce lighting takes advantage of white walls: the light hits the surface, reflects, and fills the room with a smoother glow. With two budget LED panels mounted on the camera top or desk, you balance the face and keep the room lights on, so the exposure stays consistent. This setup eliminates sharp contrasts, lets you stay in frame, and makes your stream look professional without crowding the desk. LED Lighting King
Set Up Dual LED Panels for Balanced Illumination

You’ll want to position the two LED panels at eye level on opposite sides, so the light hits your face evenly and eliminates harsh shadows. A compact RGBIC solution can also help maintain consistent color accuracy across the two panels, especially when synchronized with game audio for immersive streams RGBIC technology.
Balanced Light Placement
A pair of budget LED panels set at roughly a 45‑degree angle on each side of you’ll give balanced illumination and eliminate forehead hotspots that a single harsh light creates. Position the lights a foot or two away, then let the room’s ambient light fill the gaps; this prevents overexposure and keeps cheap webcam auto‑exposure stable. Mount the compact panels on desk stands or small top mounts, and plug them into USB for adjustable brightness and color temperature. Use the RGB or temperature controls to match your white walls, creating a natural, even glow. Balanced lighting helps reduce glare and ensures consistent exposure across marathon streaming sessions.
Soft Diffused Glow
Ever wondered how a simple wall bounce can turn harsh LED panels into a gentle, even glow? Use two budget LEDs and aim them at the nearest wall or ceiling, not directly at your face. The wall bounce creates diffusion lighting that softens shadows and spreads light evenly across the room.
Position each panel on a desk stand or camera top, keeping them a few feet from you but close to the wall for maximum bounce.
If your panels are RGB‑capable, dial in a neutral temperature to preserve skin tones while maintaining the soft glow.
Turn on ambient room lights to keep your cheap webcam from auto‑exposing, and you’ll get a balanced, professional look without crowding your tiny space.
Add a Compact Camera‑Top LED Panel for Ultra‑Small Desks
When space is tight, mounting a tiny LED panel directly above your webcam delivers soft, even light without the need for a floor lamp. This on-camera lighting solution fits ultra‑small desks, cuts shadows, and keeps your framing clean. Choose a USB‑powered, compact lighting unit that clips onto the camera or slides onto a short stand for proximity. If you need extra balance, add a second panel to the side to tame forehead hotspots. RGB options let you tweak mood instantly, and magnetic mounts keep everything secure.
Compact USB LED panel clips above webcam, delivering soft, even light for tight desks without a floor lamp.
- Pick a 2‑inch USB LED panel for minimal bulk.
- Attach a short on‑camera stand for angled light.
- Add a twin panel for balanced exposure.
- Use magnetic clips to secure and adjust quickly.
Choose a Compact Microphone (Lavalier or Shotgun) for Tight Desks
Tight‑desk audio demands a space‑saving mic that stays out of the way while delivering clear sound. A lavalier mic clips to your shirt, keeping the pickup point constant without crowding the surface. Choose a wireless set like Sennheiser AVX for flexibility and fewer cables, or go wired if budget matters. If you prefer a directional pickup, a compact shotgun mounted on your camera—think Sony ECM series—captures voice while staying low‑profile. Both options let you use noise gates and low‑pass filters to tame room reflections. Avoid bulky models like the Shure SM7B; they eat up precious desk space. By selecting a lavalier mic or compact shotgun, you achieve clean, space‑saving audio on even the tiniest streaming workstation.
Position the Mic for Warm Sound Without a Pop Filter
Place the mic about six to twelve inches from your mouth and angle it slightly off‑axis so the sound stays warm while the plosives stay tame. If you can’t use a pop filter, try a small foam windscreen or a thin piece of fabric as a cheap alternative. Finally, dial the gain just enough to capture the full low‑mid richness and add a light noise gate in post‑processing to keep room hiss at bay.
Close Mic Placement
Ever wonder how to coax a richer tone from a budget mic without a pop filter? You can achieve warm, intimate sound by pulling the mic close, using a microphone arm to free desk space, and keeping the cardioid pattern pointed at your mouth. The trick is to stay just enough away to tame plosives while still capturing the full vocal body.
- Mount the mic on a sturdy arm, positioning it 2–3 inches from your lips.
- Angle the capsule slightly upward to reduce direct airflow.
- Keep the room quiet; the tight distance cuts white‑noise and reflections.
- Test the RGB mute indicator to confirm it stays silent when you’re not speaking.
Use Pop‑Filter Alternatives
Grab the mic and pull it close—about 2–3 inches from your lips—so the capsule captures the full vocal body while the cardioid pattern naturally tames plosives. A close‑mic setup lets you ditch a pop filter and still keep pops at bay. Mount the FineAMPly Game or K669B on a sturdy arm (≈$18) to lock the distance; the arm gives you precise mic placement without cluttering the desk. Position the capsule slightly off‑axis to let air flow around it, which further reduces “p‑p‑p” bursts. If you have a two‑mic rig, use one close‑mic for warmth and a second farther away for ambience—this balances proximity richness with room tone, proving that pop‑filter alternatives can be cheap, simple, and effective.
Adjust Gain Settings
Getting the mic a few inches from your lips boosts warmth and presence, letting you dial the gain down and keep room noise at bay without a pop filter. Position a dynamic mic like the K669B about 6–12 inches away, angle it slightly off‑axis, and speak at a conversational level. A light high‑pass filter tames rumble, so you can raise perceived warmth without cranking gain. Test in the quietest spot you can find, adjusting mic placement until plosives stay tame.
- Place mic 4–6 inches from mouth for warm tone.
- Angle mic 10°–15° away to reduce pops.
- Set gain low; increase only if needed.
- Apply low‑cut filter to cut rumble and aid pop mitigation.
Turn a Numpad Into a Low‑Cost Stream Deck
If you’re cramped for desk space but still want instant access to OBS shortcuts, a cheap numpad can replace a pricey stream deck. A basic ten‑key pad costs $10–$12 and, with free macro software, each key becomes a programmable hotkey. Install a lightweight program like AutoHotkey or Stream Deck Mobile, map the keys to scene changes, source toggles, and audio tweaks, then plug the numpad into any USB port. Pair it with a webcam and your OBS setup, and you’ll switch scenes or mute mics without reaching for the mouse. The system stays compact, costs next, and eliminates extra hardware, giving you hands‑free control while keeping your tiny streaming desk tidy.
Configure OBS for a Single‑Screen Layout on Small Monitors
How can you fit a clean, single‑screen stream onto a tiny monitor without sacrificing quality? In OBS Studio, name your webcam source (e.g., “em c960”) and set it to 1080p. If the preview looks cramped, add a custom resolution so the live view fills the screen. Use a two‑panel lighting setup to soften shadows and keep exposure even, which helps the single‑screen layout stay stable. Position the game window in a corner, then enable full‑screen mode for the windowed capture to maximize space.
- Rename webcam source and set 1080p resolution.
- Add custom resolution to scale preview.
- Apply two‑panel lighting for even exposure.
- Place game window in corner, switch to full‑screen.
Optimize Auto‑Exposure and White Balance on Budget Webcams
Ever struggled with a budget webcam that flickers between over‑exposed and dim patches? You can tame its auto‑exposure and white‑balance with simple lighting tricks. First, set up two cheap LED panels on opposite sides of your desk, keeping them at similar distances. Use white walls or a light‑colored backdrop to bounce light evenly, which steadies auto‑exposure. Turn on room lights to avoid low‑ambient flicker, and match the webcam’s native 1080p in OBS with a custom resolution for clearer exposure control.
| Step | Action |
|---|---|
| 1 | Place two LED panels symmetrically |
| 2 | Use white walls or light surfaces |
| 3 | Enable room lighting |
| 4 | Set OBS resolution to native 1080p |
These tweaks keep budget webcams looking consistent and professional.
Apply Noise‑Gate and EQ Settings for Cleaner Audio
When you set up a noise gate and EQ together, you’ll instantly tame background hum and bring out the clarity of your voice. Pair a proximity/near‑field microphone with a soft‑attack gate set around –40 to –60 dBFS, then apply a low‑cut at 80‑120 Hz to ditch rumble. Boost 2‑4 kHz by 2‑4 dB for presence, and keep de‑essing handy to control sibilance.
- Position mic 6‑12 inches from your mouth for a strong signal‑to‑noise ratio.
- Set the noise gate threshold low enough to silence idle room noise.
- Add a high‑pass filter to eliminate proximity bass.
- Apply a gentle EQ boost in the 2‑4 kHz range, then fine‑tune per mic if you use multiple sources.
These steps give you clean, focused audio without expensive gear.
Test, Tweak, and Troubleshoot Common Small‑Space Streaming Issues
Where does your stream stumble in a cramped room? Start by checking lighting: two budget LED panels give even, soft light and eliminate hotspots that make your face look flat. Swap a single lamp for the panels and watch the exposure stabilize.
Next, test audio. Clip a lavalier or shotgun mic to the camera, then enable a noise gate and low‑pass filter in OBS. Speak loudly enough to trigger the gate but not so loud that it clips.
Verify your streaming setup by launching a private stream and confirming the fixed source name (e.g., “C960”) appears correctly at 1080p. If the picture crops, adjust the custom resolution in OBS.
Finally, use a foot pedal for hotkeys to keep the desk clear and reduce accidental clicks.
Frequently Asked Questions
What Is the $20 a Month Streaming TV Service?
You’re probably thinking of services like Sling TV, Philo, or Pluto TV’s paid tier—each charges around $20 a month for basic live channels, on‑demand libraries, and multi‑device streaming.
Is There a Cheaper Way to Stream?
Yes, you can stream cheaper by using a free OBS setup, a budget USB mic, cheap LED panels, and a DIY Numpad macro board, cutting costs while keeping quality decent.
What Is the Cheapest Way of Streaming?
You stream cheapest by using a $30 USB mic, a $20‑$30 1080p webcam, two $15 LED panels, free OBS software, and a free trial keyword tool—no extra gear needed.
What Does a Beginner Streamer Need?
You need a budget mic, a webcam, basic lighting, a PC that runs OBS, and a stable internet connection. Keep it simple: plug‑in, set up sources, adjust resolution, and start streaming.
In Summary
You’ve got the budget, the gear, and the setup nailed down, so now you can stream from a tiny room without breaking the bank. By balancing lighting, using a compact webcam with a wide‑angle lens, and fine‑tuning OBS and audio, you’ll deliver crisp, professional‑looking content even in cramped spaces. Keep testing, tweak as needed, and enjoy smooth, affordable streaming every time.


Leave a Reply