Pick an L‑shaped desk or a simple rectangular one with MDF or glass tops for a premium feel on a budget, then keep only your monitor, keyboard, mouse, and a single mouse pad on the surface. Use a labeled tray or drawer for small items, and hide rarely used gear in a box or on a pegboard. Add castor‑mounted rolling drawers or shelves for easy access, and apply contact paper with DIY handles for a fresh look. Finish with a subtle RGB strip behind the monitor for calm ambience; keep reading to discover even more low‑cost tweaks.
Choose a Desk Shape That Fits Your Budget
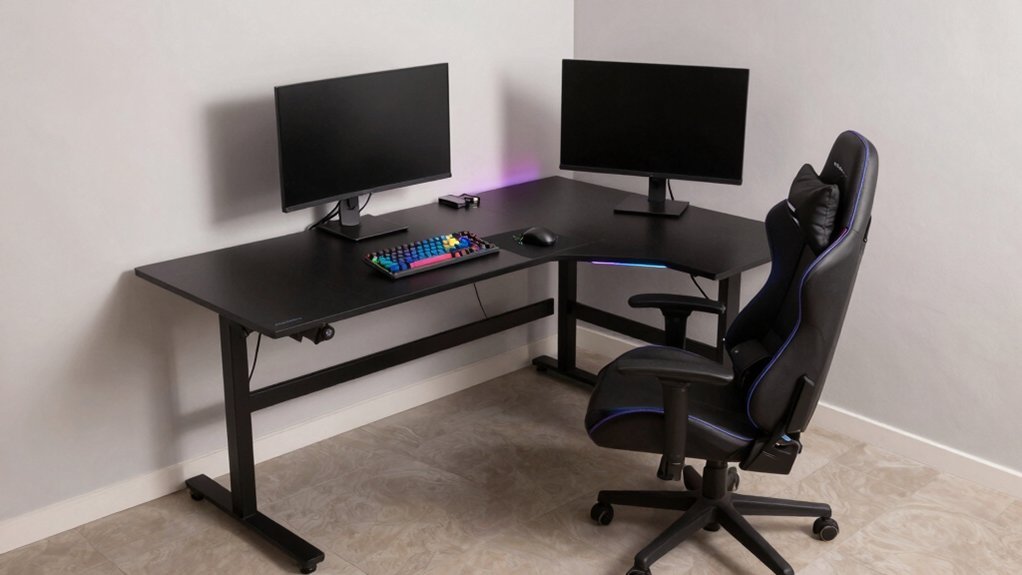
If you’re watching your wallet, start by picking a desk shape that maximizes usable space without breaking the bank. An L‑shaped desk gives you two work zones, so you can spread monitors, keyboard, and mouse while keeping the main area clear for gaming gear. Look for budget‑friendly options—MDF or glass tops with sturdy legs—because they deliver a premium feel and smart ergonomics without a pricey brand tag. Ample surface area lets you arrange cables neatly, and built‑in cable management keeps the setup tidy. Prioritize function over flair; the L‑shaped layout fits corners and larger rooms, letting you keep essential equipment within reach while leaving room for future upgrades like modular lighting or accessories. This approach maximizes organization and immersion without overspending while maintaining durability.
Declutter the Surface and Prioritize Essentials
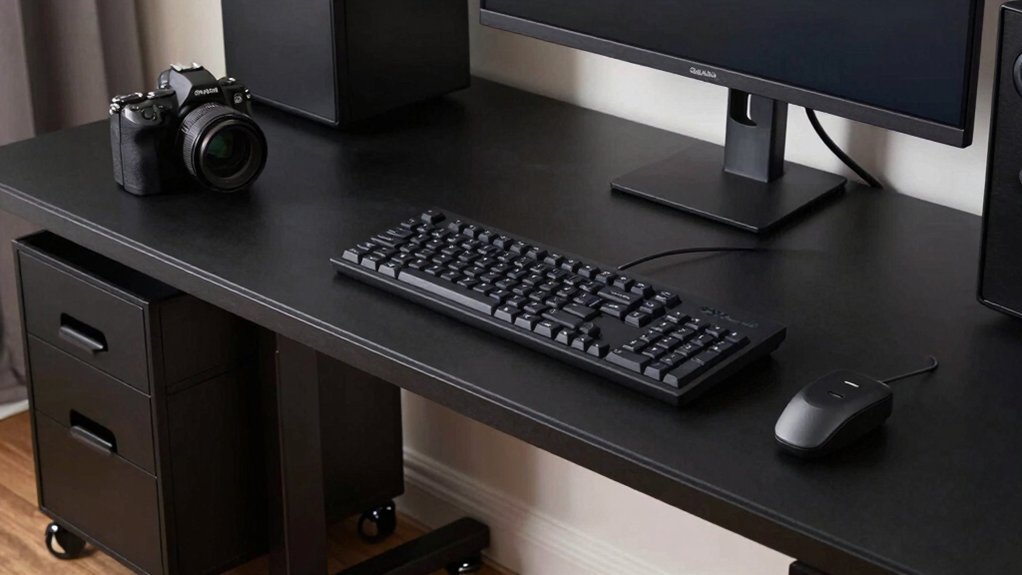
You’ll keep only the essentials on the desktop, stashing rarely used accessories in drawers or behind doors. By hiding the non‑essentials, the surface stays calm and you can spot what you need at a glance. This minimal setup speeds up your gaming flow and cuts down visual clutter. The right charging station can also help maintain a clean desk by consolidating controllers and peripherals in one tucked-away spot consolidated charging.
Essential Items Only
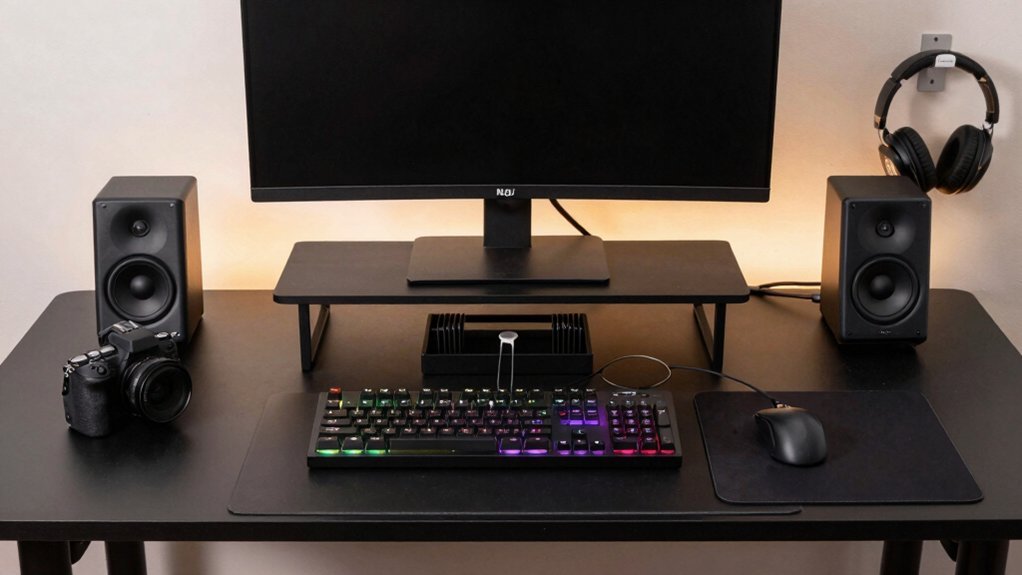
A tidy gaming desk starts with just a few essentials: the monitor, keyboard, mouse, and a single mouse pad or desk mat. Keep the surface clear by removing anything that isn’t used daily.
Store a small notebook, USB drive, and charger in a labeled tray or drawer so they’re reachable but out of sight. Install a shallow tray or cup holder for a headset and a pair of speakers, limiting peripherals to one set each.
Set up a dedicated cable management zone using under‑desk channels or clips to guide cords away from the work area. Position the monitor stand, keyboard wrist rest, and any quick‑access tools within arm’s reach. This minimal setup reduces visual clutter, streamlines workflow, and keeps your gaming space functional and tidy. Additionally, consider a universal-fit console cover to protect your surfaces from daily wear and dust universal-fit console cover for a simple, affordable add-on that helps maintain a neat setup.
Hide Unused Accessories
After clearing the desk to the basics, start hiding the gear you rarely use. Use a shallow tray or riser to stack seldom‑used peripherals, keeping daily essentials visible. Store bulkier accessories in a labeled box or drawer with a lid, so dust and visual clutter stay hidden. Mount a pegboard or wall rack above the desk for off‑screen items like spare keys, cables, or tiny tools. Group cables and small gadgets into labeled pouches or zippered bags, then tuck them into a drawer or under the desk. Rotate items periodically, swapping nonessential gear for purpose‑built storage solutions. This routine sharpens desk organization, preserves a clean surface, and ensures you only reach for what you truly need. Light Blocking helps keep gear and cables out of sight by reducing glare on your display and making the surface appear tidier.
Add Castor‑Mounted Rolling Storage to Your Budget Gaming Desk
A few castor‑mounted rolling units can instantly turn a cramped gaming desk into a mobile, clutter‑free workstation. By adding lightweight drawers or bins on castors, you gain fast‑access storage that slides right where you need it. When a game pauses or you need a spare cable, just roll the unit under the desk or beside the monitor—no digging through piles. Pair the rolling storage with dust‑protective drawers to keep gear clean while staying within reach. The rolling setup can help optimize outlet layout and plug management by keeping surge-protected power strips and USB hubs within easy reach design and mounting considerations. Because castors let you reposition the unit in seconds, you can experiment with layouts, placing it near your keyboard, headset, or charging hub without committing to a permanent spot. This flexible, budget‑friendly solution maximizes under‑desk space and eliminates interruptions during play.
Install Simple Shelves So You Can See Everything
Looking to cut down on endless rummaging while you game? Install simple shelves above your desk so everything you need stays in sight. Place the shelves at eye level to cut neck strain and create a visual anchor that keeps the desktop clean. Use a budget‑friendly open‑shelving system; you’ll spot collectibles, miniatures, and peripherals at a glance without opening drawers. Arrange staggered heights and add labeled bins or trays for cables, manuals, and tiny tools, making retrieval fast and effortless. Pair each shelf with a shallow box or short tray to catch dust while preserving the open look. This setup slashes search time, boosts focus, and keeps your gaming space tidy without breaking the bank. Accessible storage helps preserve game components like tokens and small parts and keeps them within easy reach for quick setup and teardown.
Use Wall‑Mounted Pegboards for Tools and Small Collectibles
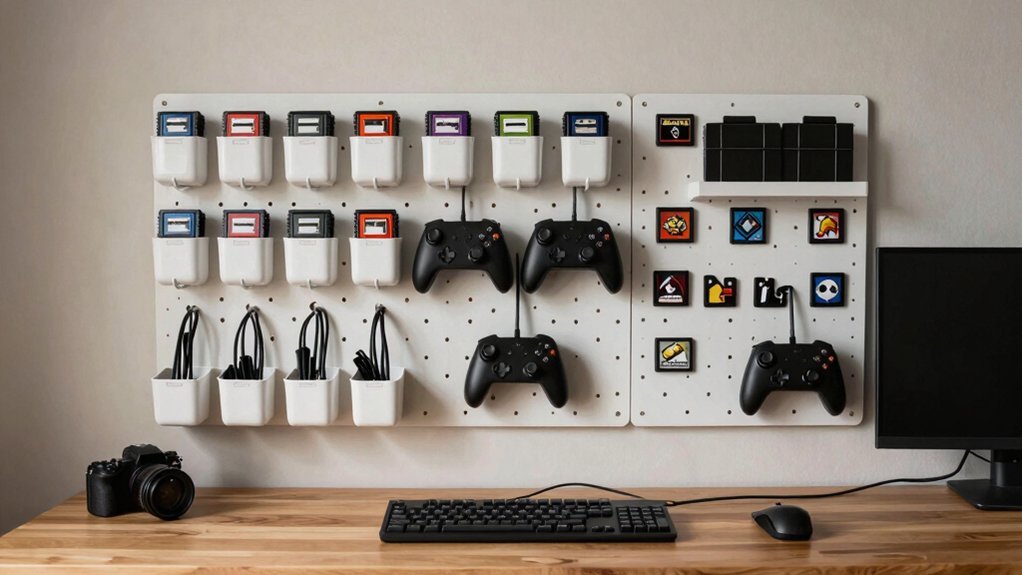
Wall-mounted pegboards give you instant, at‑reach access to the tools and tiny collectibles that usually clutter a gaming desk. You’ll see dusters, spare batteries, and keycaps arranged on hooks, while small shelves hold figurines or custom keycap sets, keeping everything visible and dust‑free. By mounting the pegboard above your monitor or beside the desk, you create vertical storage that frees surface area for your mouse, headset, and keyboard. The modular nature of a pegboard lets you rearrange hooks and bins as your collection grows, eliminating the need for new furniture and keeping your setup tidy and efficient. Cable size compatibility ensures you can select hooks and bins that accommodate your various cables without crowding.
Tame Cables With Ties, Clips & DIY Channels
Cables can quickly turn a tidy gaming desk into a tangled mess, but with reusable ties, clips, and simple DIY channels you’ll keep everything organized and out of sight. First, unplug everything, then group cords by function—power, display, USB—using reusable cable ties. Tuck the bundles beneath the desk or along the frame so they’re hidden.
Mount a power strip under the desk to centralize outlets and keep the surface clear. Attach clips or cable holders to the back of the desk or the monitor pillar to guide individual cords.
For a sleek look, build a DIY channel or raceway along the desk edge; route the cables through it and secure any excess on the power strip. These steps create effective cable management without breaking the bank.
Build a Dedicated Headset Hook or Stand From Repurposed Parts
You can turn old binder rings into a sturdy headset hanger by slipping the headband through the ring and securing it with Velcro strips for easy removal. Adding an adjustable clamp bracket to the desk edge lets you fine‑tune the height and angle, keeping the headset within reach. This simple repurposing gives you a reliable, low‑cost holder without cluttering your setup.
Clipurpose Old Binder Rings
One or two old binder rings, trimmed to a 9–12 mm diameter, make a sturdy, low-profile headset hook that snaps onto a desk edge or monitor stand. You’ll cut the rings, slide a zip-tie through, and clamp the assembly under the desk leg or onto the monitor base. A thin piece of foam inside each ring cushions the headband and prevents scratches, while a medium-gauge ring balances strength and flexibility for daily use.
- Trim and smooth the rings to the right size.
- Thread a zip-tie or adhesive hook through the rings and attach to the desk.
- Add foam or felt for cushioning and extra grip.
This quick, cheap solution keeps your headset off the surface and within arm’s reach.
Mount With Velcro Strips
After trimming the binder rings, you can upgrade to a Velcro‑mounted hook that stays flush with the desk edge. Grab a sturdy piece of wire or a bent coat‑hanger, bend it into a “J” shape, and slide a wide Velcro strip onto the flat side. Press the opposite side of the strip onto the desk edge, making sure the surface is clean. For extra security, add a few short Velcro strips along the mounting area; they spread the load and let the hook hold headsets weighing up to 0.8 kg. Position the hook at ear‑level so you can toss and headset on and off without straining your neck. When you need to move it, just peel the strips off—no tools, no damage, and minimal residue.
Add Adjustable Clamp Bracket
Ever wondered how to keep a headset within arm’s reach without drilling holes? You can turn a simple C‑clamp or spring‑loaded grip into a sturdy headset hook that slides along your desk edge. Grab a small metal bracket, a camera‑mount clamp, or a tilt hinge, then add a soft pad or microfiber sleeve to protect the headband. Position the hook at ear‑height or a little lower so you avoid neck strain, and attach a removable cable clip to keep cords tidy and snag‑free.
- Select a clamp – choose a C‑clamp or spring grip that fits your desk thickness.
- Attach the bracket – secure the metal bracket or hinge to the clamp, ensuring it holds 1‑2 kg.
- Add padding and cable clip – slip a microfiber sleeve onto the hook and clip a cable organizer for clean routing.
Add a Spill‑Safe Drink‑Holder for Gaming Sessions
Looking for a simple way to keep your drinks from turning your gaming desk into a mess? A spill‑proof drink holder with high edges and a wide base catches cups, bowls, or mugs up to 20 oz, preventing overflow during intense sessions.
Clip‑on mug holders attach to the desk edge or monitor stand, keeping beverages away from keyboards and mice while freeing workspace.
A large coaster or tray with raised rims cradles drinks and stops drips from reaching electronics or papers.
Position the holder within arm’s reach but outside the keyboard’s direct path to minimize accidental spills during fast actions.
Consider a modular, gravity‑fed or magnetic cup holder that you can move between surfaces as you reconfigure your desk.
Refresh the Desk With Contact Paper & DIY Handles
Pick a vibrant pattern that matches your gaming vibe, then smooth the contact paper onto the desk, pressing out bubbles as you go. Trim any excess for a clean edge, and attach sturdy DIY handles that fit the new surface. The result is a fresh, personalized workspace without a costly replacement.
Choose Vibrant Patterns
A quick way to revitalize your gaming desk is to cover the surface with vibrant contact paper and swap out the drawer handles for bold, inexpensive hardware. Pick a pattern that screams personality—geometric prints, woodgrain textures, or neon accents—and match it to your gaming desk setup. Choose a durable, laminated sheet so spills and mouse‑pad friction won’t ruin the look.
Layer two tones or mix motifs to carve out zones for keyboards, headphones, and controllers, giving each area a visual cue. Finish the edges with corner guards to keep the paper from peeling.
- Select a pattern that complements your color scheme.
- Cut the paper to fit each drawer and the desktop.
- Apply a protective laminate for lasting wear resistance.
Apply Smoothly, Trim Excess
Ever wondered how to give your gaming desk a brand‑new look without splurging? Grab self‑adhesive vinyl that mimics wood or metal, cut it to size, then smooth it onto the surface. Use a ruler and a roller to press out bubbles, working from the center outward.
When the paper meets the edge, slice a a utility knife a trim sharply, leaving a clean line. Next, remove the old handles and swap them for affordable ergonomic pulls. Pre‑measure screw holes, hand‑tighten bolts, and give the desk a wobble test to ensure alignment.
Choose a matte finish to curb glare and fingerprints, and pair dark handles with a light‑colored paper for a cohesive look. This quick makeover boosts gaming desk organization without breaking the bank.
Install Secure DIY Handles
Ready to revamp your gaming desk without breaking the bank? Strip the old hardware handles, then cover the surface with contact paper for a fresh look. Pick sturdy, secure grips that won’t loosen during marathon sessions. Align the new DIY handles with existing holes or pre‑drilled inserts to avoid extra drilling and keep the finish flush. This combo of paper and handles transforms the desk while preserving its structure and staying budget‑friendly.
- Remove old handles, clean the area, and apply contact paper smoothly.
- Choose hardware handles with a solid mount and secure grip.
- Install the handles into existing holes, tighten, and check stability.
Store Games and Accessories in a Budget Credenza or Drawer System
How can you keep your gaming space tidy without breaking the bank? You can grab a budget credenza that offers versatile storage with three drawers and lockable compartments for games and accessories. Choose a woodgrain, walnut, or white finish to match your desk aesthetic while keeping everything out of sight. The cabinet flips between right‑hand and left‑hand orientation, so you can place it where it fits your room layout best. Use the top drawer for quick‑grab controllers, the middle for discs, and the bottom for consoles or extra gear. This minimalist storage design slashes clutter, frees surface area, and lets you reach your favorite titles in seconds. The lock keeps pricey items safe, and the compact footprint works even in tight setups.
Optimize Desk Height and Leg Space for Ergonomic Freedom
Looking to boost comfort while you game? You can achieve true ergonomics by tuning desk height and leg space. First, set the monitor so its top sits at or just below eye level; your elbows should form a comfortable 90‑degree angle while you type. Second, keep a clear under‑desk zone of at least 60 cm wide and 50 cm tall so your legs move freely and you can stretch between sessions. Third, choose a desk with adjustable height—manual or motorized—to switch between sitting and standing, boosting circulation and reducing fatigue.
Adjust monitor to eye level, keep 60 cm × 50 cm leg clearance, and use an adjustable‑height desk.
- Position monitor at eye level, elbows at 90°
- Preserve 60 cm × 50 cm under‑desk clearance
- Use an adjustable‑height desk for sit‑stand flexibility
Polish the Look With Minimal RGB Lighting
After dialing in the perfect desk height and leg space, you can turn your focus to lighting that enhances the vibe without overwhelming the senses. Choose minimal RGB lighting that delivers a subtle, low‑key accent rather than a full‑spectrum blast. Tuck an LED strip behind your monitor or under a floating shelf so the glow stays indirect and doesn’t reflect on screens. Stick to a single color profile—warm‑neutral tones around 2700K–3500K—to create a cozy atmosphere and reduce eye strain. Limit RGB to essential items like your keyboard, mouse, or one monitor backlight, keeping the desk tidy. Avoid pulsating or strobing effects; a steady, gentle illumination maintains a calm, distraction‑free gaming zone while still polishing the overall look.
Frequently Asked Questions
How Do I Organize My Gaming Desk?
You should use castors on storage, mix drawers, open shelves, and pegboards, route cables through a central pillar with a hidden power strip, and keep essentials within arm’s reach on open-wall trays.
Is a $600 Dollar Gaming PC Good?
Yes, a $600 gaming PC will run most titles at 1080p medium‑high settings, though ultra‑AAA games may need compromises. Focus on solid CPU, decent GPU, 16 GB RAM, and upgrade storage or cooling later.
How to Make a Budget Gaming Setup?
Start with a sturdy, inexpensive L‑shaped desk and an ergonomic chair, then add cheap cable trays, zip ties, and DIY décor. Upgrade gradually with lighting or wall mounts as your budget allows.
How to Organize Your Desk Without Buying Anything?
Start by unplugging everything, then lay cables flat to see which you truly need. Use built‑in channels, group items by purpose, and repurpose existing drawers or wall space for storage.
In Summary
By picking a budget‑friendly shape, clearing the clutter, and adding cheap rolling storage, you’ll keep everything within reach. Simple shelves and a wall‑mounted pegboard let you see and grab tools fast. Refresh the surface with contact paper and DIY handles for a sleek look, then store games in a low‑cost credenza. Adjust height and leg space for comfort, and finish with minimal RGB for that gamer vibe—without breaking the bank.


Leave a Reply