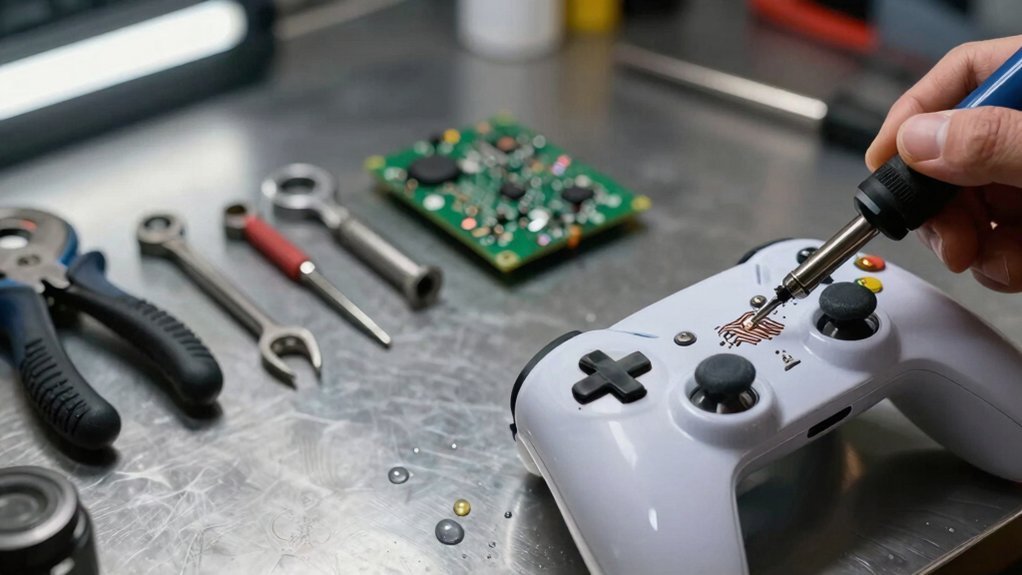
You’ll start by gathering Torx T6/T9 drivers, a spudger, lint‑free cloths, 90 %+ isopropyl alcohol, contact cleaner, and silicone grease. Remove batteries, place the controller on a static‑free mat, and photograph screw locations. Clean joystick, button, and D‑pad contacts with alcohol‑dampened Q‑tips, then lubricate the joystick bearings with a pea‑sized dot of silicone grease. Swap worn conductive pads on triggers and buttons, and re‑apply matching conductive foam to a loose D‑pad, soldering any loose traces. Test each input, reassemble in reverse order, and compare repair cost to a new controller before you explore the full list.
Gather Tools & Safety Precautions for Controller Repair
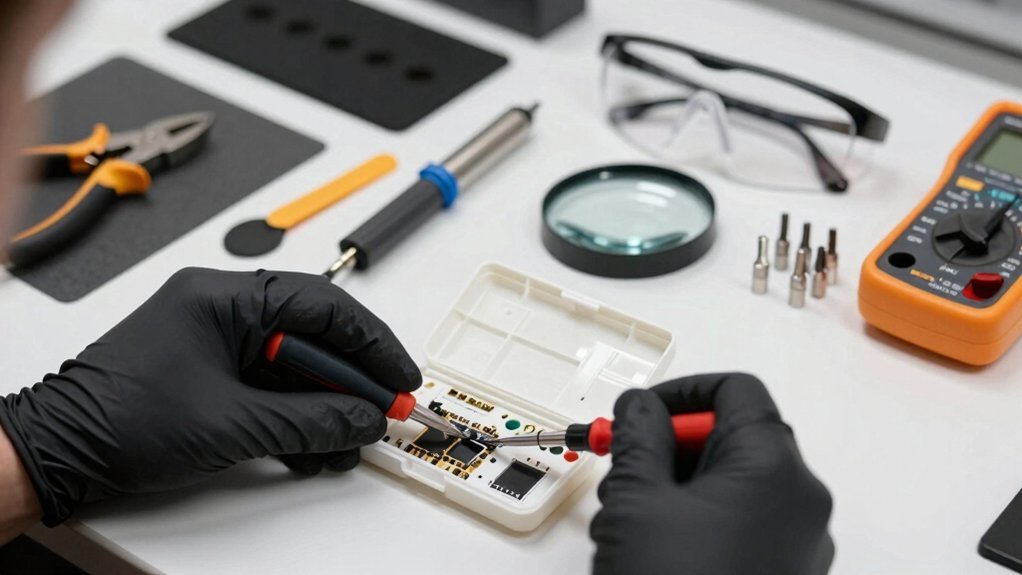
A solid toolkit is essential before you even touch a controller. Gather Torx drivers (T6 and T9), a spudger, small pry tools, a soft brush, lint‑free cloths, and a bottle of isopropyl alcohol (90%+ preferred). Add contact cleaner and anti‑corrosion lubricant for later maintenance. Before you start, remove the batteries and place the controller on a static‑free mat to avoid short circuits. Use compressed air and the brush first, then dampen a cloth with isopropyl alcohol to clean contacts without risking water damage. Photograph screw locations and button layouts so you can reassemble correctly. Finally, note each replacement part’s manufacturer and model number, checking the underside or battery compartment for matching markings. This preparation saves time and prevents costly mistakes. Safety and organization
Controller Repair: Disassemble Safely, Remove Batteries & Identify Screws
– Ensure you follow mounting weight guidelines when reassembling to prevent stress on brackets and to maintain safety weight limits
Clean Internal Contacts With Isopropyl Alcohol & a Q‑Tip
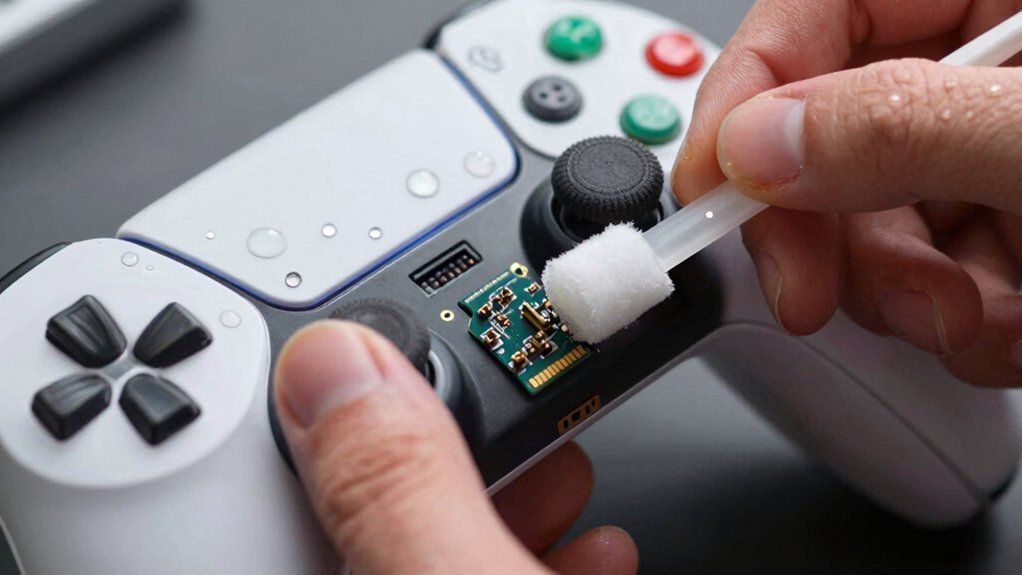
Ever wondered why your joystick feels sticky after years of use? Grab a bottle of isopropyl alcohol and a clean Q‑tip, then gently dab the contact points around the joystick base, face buttons, and shoulder pads. The alcohol dissolves oily grime and residue without dislodging delicate coatings. Lightly wipe each area, letting the liquid soak into the rubber pads and circuit traces, then let everything dry completely—no moisture should remain before you reassemble. After drying, check continuity with a multimeter or simply test the inputs; you should notice smoother response and less stickiness. This quick, low‑risk step restores crisp actuation and prevents corrosion, setting the stage for any further repairs you plan. Moisture-wicking grips and three‑layer cushioning can further improve comfort during extended repairs and testing.
Lubricate Joystick Bearings With Silicone Grease to Eliminate Squeak
You’ll start by carefully disassembling the joystick to expose the bearings, then apply a thin bead of silicone grease directly to the contact points, making sure not to over‑coat.
Next, move the stick through its full range several times to spread the lubricant evenly and check for any remaining friction.
Finally, reassemble the controller and test the joystick for smooth, silent operation to confirm the squeak is gone.
Additionally, ensure you clean any excess grease from surrounding components to avoid dust attraction and maintain long-term performance maintenance tips.
Silicone Grease Application
Silicone grease creates a thin, non‑conductive film that cuts friction between the joystick bearings and housing, instantly silencing squeaks. You’ll want a precision applicator or cotton swab, a tiny dab of grease, and a clean cloth for excess. Apply a modest amount directly to the bearing surfaces, then move the stick back and forth to spread the film evenly. The grease stays stable across temperature swings, so you won’t worry about drying out or attracting dust. After wiping away surplus, test the joystick for smooth, quiet return to center—if it feels responsive, you’ve succeeded.
- Use only a pea‑sized dot of grease per bearing
- Target the shaft‑to‑cup interface precisely
- Rotate the stick to distribute the film
- Wipe excess promptly to avoid dust buildup
- Verify quiet, smooth operation before reassembly
A careful inspection of the connector area can help prevent future squeaks by ensuring the housing remains properly aligned, which is reinforced by considering three‑row outlet design concepts for better cable organization. linking concept: outlet layout
Bearing Disassembly Procedure
How do you safely access the joystick’s internal bearings without disturbing the PCB? First, unscrew the top panel and gently lift the joystick assembly, keeping the PCB untouched. Use a soft plastic spudger to pry the bearing retainer away, then slide the two bearing halves off the shaft. Apply a thin bead of silicone grease to each surface, avoiding excess that could attract dust. Re‑insert the halves, verify the shaft stays centered, and snap the retainer back in place. Finally, re‑secure the panel and test for smooth, quiet motion.
| Step | Tool | Tip |
|---|---|---|
| 1 | Phillips screwdriver | Remove panel screws |
| 2 | Plastic spudger | Lift retainer without scratching |
| 3 | Silicone grease | Use sparingly on bearing surfaces |
1 For long-term maintenance, consider periodic checks of high-use controllers to prevent squeaks before they start.
Post‑Lubrication Testing Steps
With the retainer snapped back in place, run the joystick through its full sweep to confirm the silicone grease has silenced the squeak. Then, move the stick slowly from left to right, up to down, and back to neutral, listening for any faint noise. Check dead zones by stopping at the extremes and releasing to see if the stick recenters consistently. Perform a few rapid micro‑movements to expose hidden friction, and if you hear a whisper, add a tiny film of silicone grease. Finally, note the tactile feel and audible difference compared to before the lubrication. Verify that the setup supports under‑desk organization and clutter reduction for a cleaner gaming station cable management and maintain a steady workflow.
Replace Worn Conductive Pads on Triggers & Buttons
You’ll first spot worn pads by feeling sluggish or missing inputs on your triggers and buttons.
Then grab a compatible conductive‑rubber kit—check the controller model to ensure a perfect match.
Finally, peel off the old pads, clean the contacts, and press the new ones flush for reliable, instant response.
Identifying Pad Wear
Ever notice a trigger that feels sluggish or a button that barely registers a press? That’s usually a sign the conductive pads are worn. First, power off the controller and remove the outer shell to expose the switches. Inspect each pad under good light; look for thinning, discoloration, or flattening that cuts the contact area. Gently press the switch with a fingertip—if you feel a spongy give or hear a faint click, the pad may be losing elasticity. Use a magnifying glass to check for uneven wear or residue that could increase resistance. Finally, compare the pad’s thickness to a fresh one from a repair kit; a noticeable difference means it’s time to replace it.
- Thin or translucent pads
- Discolored or burnt spots
- Flattened surfaces reducing contact
- Uneven wear patterns
- Excessive give when pressed
Sourcing Replacement Conductive Pads
Finding the right replacement conductive pads starts with matching the original’s thickness, footprint, and durometer, so you’ll need the controller’s model number and a quick visual check of the worn pads.
First, note the pad’s dimensions and hardness; then search for silicone rubber pads with embedded carbon or graphite that list those specs.
Console5.com carries dedicated kits for most major consoles, and eBay offers comparable listings if the primary source is out of stock.
When you locate a product, verify the description mentions the exact model family and includes a thickness chart.
Choose pads whose durometer mirrors the original to preserve tactile feel and reliable electrical contact.
Once you’ve confirmed compatibility, order a set that covers all worn triggers and buttons.
Installing Pads Securely
After you’ve sourced pads that match the original thickness, footprint, and durometer, the next step is to install them so they stay firmly in place and maintain proper electrical contact. First, photograph the old conductive pads and note their orientation. Gently pry the worn pads off with a spudger, keeping the circuit board intact. Clean the contact area with isopropyl alcohol, then apply a thin, even layer of conductive material only where the pad will sit—avoid spreading onto neighboring traces. Align the new conductive pads exactly as the originals, press them down until you feel a solid snap, and verify that no gaps remain. Finally, test each trigger and button through full travel to confirm instant, consistent registration.
- Photograph and label original pad placement
- Use a spudger to lift old pads without damaging the board
- Clean contacts thoroughly before re‑applying pads
- Apply conductive material sparingly to prevent bridging
- Press new pads firmly and test for reliable input
Diagnose & Fix Stick Drift by Realigning the Potentiometer
How can you tell if your joystick’s drift is coming from a misaligned potentiometer? You’ll notice the stick won’t return to center, and a quick calibration shows a constant offset. First, unplug the controller and remove the batteries. Open the case, locate the potentiometer, and inspect its housing for dirt or corrosion. Spray contact cleaner, wipe away debris, then gently re‑seat the slider so its rectangular pocket aligns with the protrusion. Lightly lubricate the moving parts, reassemble, and test the stick in‑game.
| Step | Action | Result |
|---|---|---|
| 1 | Power off & disassemble | Safe access |
| 2 | Clean with contact cleaner | Remove debris |
| 3 | Potentiometer realignment | Centered movement |
| 4 | Lubricate & reassemble | Drift eliminated |
Repair a Loose D‑Pad by Re‑applying Conductive Foam & Soldering
You’ll start by swapping out the old, compressed foam with a fresh piece that matches the original thickness, then line it up so the D‑Pad sits flush in its snap tabs.
Next, use a fine‑tip soldering iron to re‑attach any loose traces or grounding pads, making sure the joints are clean and solid.
Finally, test each direction with a controller tester to verify that the D‑Pad now registers four‑way input without any ghost or sticky movements.
Conductive Foam Re‑Application
When the D‑pad feels mushy or registers erratic inputs, the culprit is often worn‑out conductive foam beneath the contacts. First, pry off the D‑pad assembly and pull the old foam out. Measure its thickness, then cut a new sheet of conductive foam to match the rectangular cavity, trimming any excess that could bind. Place the fresh foam under the metal pads, making sure it sits flush without overhang. Solder any loose switches or contacts, then press the D‑pad back into place. Finally, wiggle the pad in all directions and verify stable readings in the game calibration menu.
- Inspect and measure original foam thickness
- Choose foam with similar durometer for tactile feel
- Trim foam precisely to cavity dimensions
- Secure contacts with solder before re‑installing pad
- Test for drift and intermittent input after re‑application
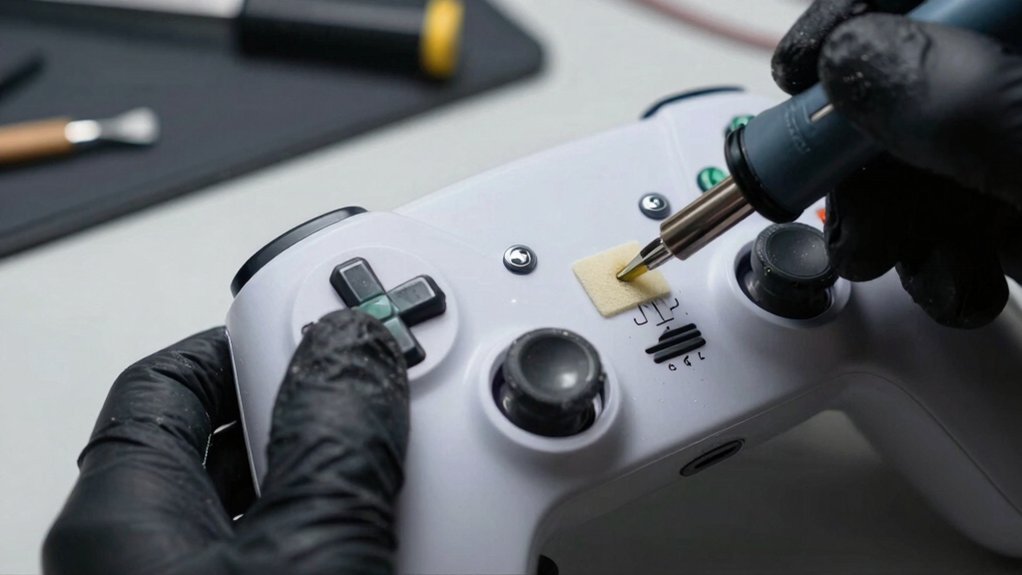
Precision Soldering Technique
A steady hand and a fine‑tip soldering iron are essential when re‑flowing the D‑pad’s tiny contacts without lifting neighboring pads.
First, clean the pad area, then apply a thin, flux‑coated solder wire. Set your temperature‑controlled iron to 260–280 °C and practice precise soldering, letting the solder melt just enough to bridge the pad’s copper to the foam.
Press a small piece of conductive foam back into place, ensuring it sits flush and provides even pressure. Use a dab of non‑corrosive adhesive to lock the pad and prevent future movement.
After cooling, test each D‑pad direction on the controller‑test menu, confirming zero dead zones.
Finally, document orientation and reassemble confidently.
Perform a Quick Function Test Before Reassembly
Ever wonder how to confirm that your controller’s issues are truly fixed before you snap it back together? Power it up, jump into a game or system menu, and test each joystick, face button, and trigger. Record any drift, lag, or missed inputs, then compare those readings to your pre‑disassembly notes. Run the built‑in calibration panel to check stick alignment and button mapping, and verify LEDs and vibration respond. Keep the session short to prevent battery drain or overheating. If something still feels off, you can go back and re‑inspect solder joints or connectors before sealing the case.
Power up, test each joystick, button, and trigger; record drift, lag, and missed inputs before reassembly.
- Test joysticks for drift and dead zones
- Press every face button and trigger for response lag
- Use the system’s calibration tool for baseline measurements
- Confirm LED indicators and vibration motors activate
- Limit testing time to avoid overheating or battery loss
Reassemble in Reverse Order, Ensuring Proper Alignment of Tabs & Connectors
After confirming the controller works, start putting it back together in reverse order, making sure each alignment tab and connector slides into its original slot. First, guide the PCB edge into the housing cutouts, checking that alignment tabs click snugly. Thread screws evenly, tightening just enough to hold parts without warping. Route all cables through their original channels, avoiding pinches that could strain connectors. Re‑attach the front panel, aligning the D‑pad and button housings with the corresponding tabs. Press the triggers and joysticks into place, confirming they move freely and register correctly. Finally, give the controller a quick functional test—press every button, pull each trigger, and move each stick—to verify that no misalignment remains before you consider the repair complete.
Evaluate Repair Cost vs. Buying a New Controller
Most DIY’ll find that comparing the total repair expense—including parts like rubber pads, potentiometers, and lubricants, plus any needed tools—to the market price of a new controller from retailers such as Console5, quickly reveals which option is more economical. You should weigh the controller’s age, compatibility, and the chance of recurring issues like stick drift or board corrosion. If a repair kit with replacement parts is easy to get and you can avoid desoldering, the cost may stay low. However, labor time can stretch to a full day, and older models often demand higher labor or become unrepairable, tipping the balance toward a fresh purchase.
- Price of replacement parts vs. new unit
- Age and compatibility considerations
- Estimated labor hours and tool costs
- Frequency of recurring failures
- Availability of ready‑made repair kits from Console5
Frequently Asked Questions
Will WD-40 Fix Stick Drift?
No, WD‑40 won’t fix stick drift; it can attract dust and degrade plastics. Clean the joystick, check for worn gears or potentiometers, recalibrate, and replace the module if the drift persists.
Can I Fix Stick Drift by Myself?
Yes, you can often fix stick drift yourself by cleaning the joystick with compressed air or a mild non‑alcohol cleaner, gently lubricating the base, and testing before considering component replacement.
Does Rubbing Alcohol Fix Stick Drift?
Yes, rubbing alcohol can often fix stick drift. You’ll clean grime from the joystick contacts, then let it dry fully before testing. If drift remains, you may need deeper repairs like replacing the potentiometer.
What Tools Do I Need for Controller Repair?
You’ll need a Torx T6/T9 screwdriver set, plastic pry tools, a small syringe of is‑based contact cleaner, silicone grease, a multimeter for continuity checks, and replacement pads or buttons from a repair kit.
In Summary
Now you’ve got the tools, the safety steps, and the know‑how to fix your controller—no need to toss it. After cleaning, lubricating, and replacing worn parts, you’ve restored smooth operation and saved cash. Test it, reassemble carefully, and you’ll be back gaming in minutes. Keep an eye on cost versus a new unit, but most repairs pay for themselves and extend your controller’s life.


Leave a Reply