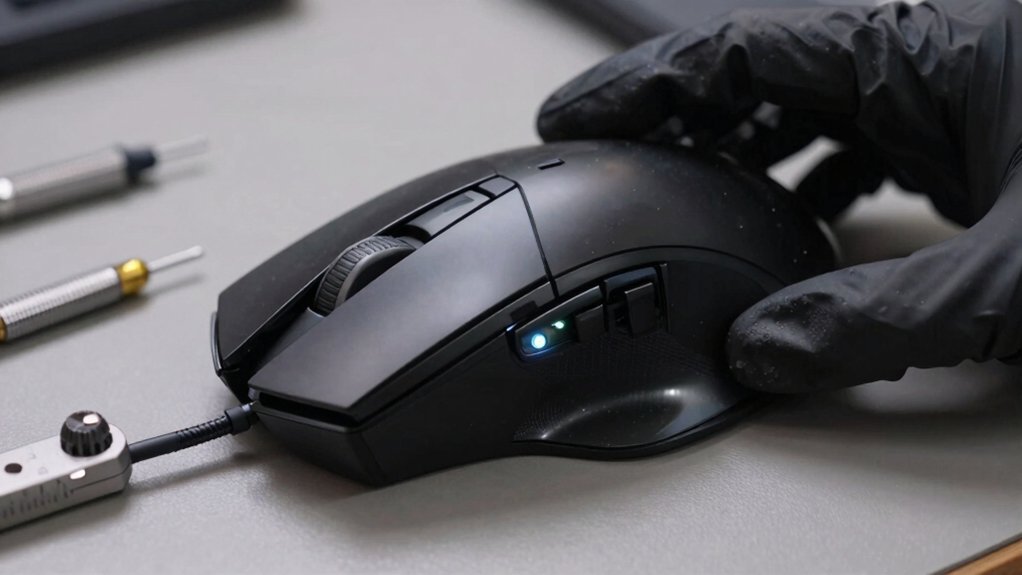
First, blow out dust with compressed air and gently wipe the sensor lens with a microfiber cloth—no liquids, no fingerprints. Next, place the mouse on a clean, matte fabric pad (about 400 × 300 mm) and run the manufacturer’s calibration tool, doing both slow and fast strokes to lock CPI and lift‑off distance. Then, test DPI settings (400‑3200) and ensure the 1000 Hz polling rate stays within ±1 % using MouseTester. Set the lift‑off distance to 1–2 mm, disable any firmware smoothing, and re‑calibrate. Finally, enable RAW input, keep DPI low‑mid (400‑800), and verify polling stability; the more you explore, the deeper the accuracy gains become.
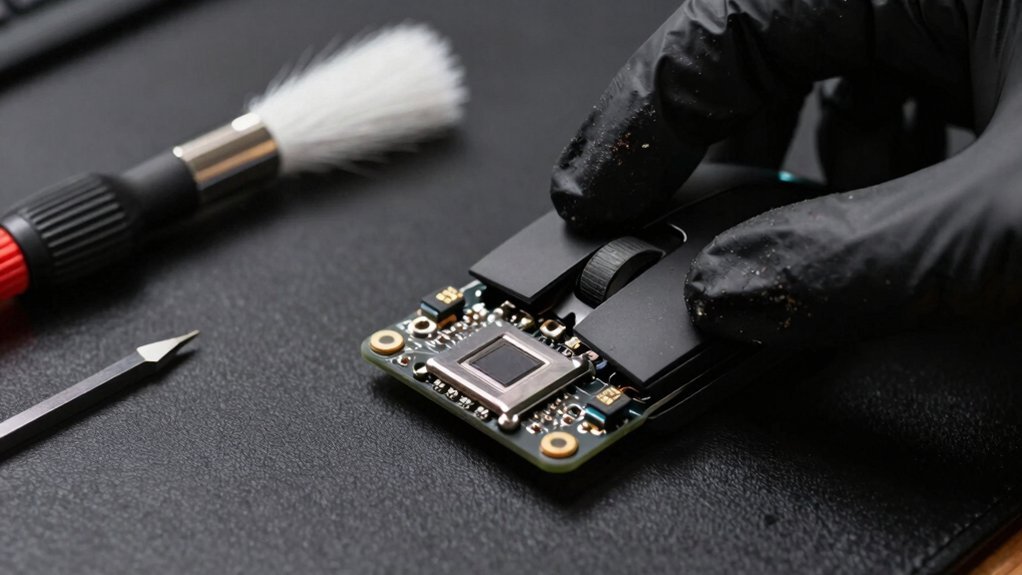
Clean the Sensor Lens for Gaming Mouse Sensor Accuracy
Ever wondered why your mouse jitters despite a high CPI setting? You’re probably overlooking sensor lens care. Start with dust removal: use compressed air to blow away debris around the sensor, then gently wipe the lens with a microfiber cloth—no liquids, no fingerprints. Avoid touching the lens; oils degrade clarity and mess up 1:1 tracking. This cleaning boosts tracking accuracy and CPI stability, making jitter prevention easier. After lens care, run a quick surface calibration to verify the sensor’s response. The cleaner the lens, the smoother the movement, and the less pixel noise you’ll see. Keep this routine before each gaming session to maintain peak performance.
Calibrate the Gaming Mouse Sensor on a Consistent Surface
How do you guarantee your mouse tracks flawlessly across every DPI setting? Start with sensor calibration on a consistent surface. Choose a matte fabric pad at least 400 mm × 300 mm, clean, flat, and dust‑free. Run the manufacturer’s surface calibration tool while the gaming mouse stays stationary, then execute slow and fast strokes. This surface calibration aligns the optical sensor’s CPI, polling rate, and lift‑off distance to the pad’s texture, eliminating drift. If you replace the pad or switch surfaces, repeat the process to maintain tracking accuracy. By calibrating on a non‑reflective, uniform mat, you ensure the optical sensor reads each movement consistently, preserving high‑precision performance across all DPI settings. For enhanced setup optimization, consider using a fire‑resistant, wall‑mountable power strip design to keep your gaming area organized and free from clutter that could interfere with cueing and cable management. design
Test Gaming Mouse Sensor Accuracy Across DPI and Polling Rates

Wondering whether your mouse truly stays on‑track at every DPI? After restoring the sensor, you need a systematic test that captures DPI stability, polling rate consistency, and 1:1 tracking fidelity. Record CPI/UA readings at 400, 800, 1600, and 3200 DPI on the same surface texture, noting any deviation. Use MouseTester or Enotus to verify a 1000 Hz polling rate with ±1 % variance across those DPI settings. Run slow and fast diagonal strokes to spot motion jitter or angle snapping, confirming 1:1 tracking. Finally, compare latency in wired versus wireless modes, aiming for sub‑2 ms wireless latency and minimal drift when re‑engaging lift‑off distance. Document surface calibration, sensor firmware, and results for calibration reproducibility. Budget monitoring and verification should also account for VRM/cooling considerations when testing performance in high‑load gaming scenarios VRM cooling.
Steps to Test
- Set surface texture and calibrate.
- Measure DPI stability at each setting.
- Validate polling rate and 1:1 tracking.
- Log latency and jitter for wired/wireless.
Set Lift‑Off Distance and Disable Smoothing for Accurate Tracking
Why bother with lift‑off distance and smoothing? You want sensor accuracy, so set lift‑off distance (LOD) low—about 1–2 mm—to stop tracking the as soon as you lift the mouse. Disabling smoothing in firmware settings preserves true 1:1 tracking and eliminates input lag. After adjusting LOD, run a surface calibration on your gaming mouse to lock in tracking consistency. Test the setup in an aim trainer; you’ll see a stable crosshair and no drift when you lift and replace the mouse. 3-piece wall art sets can serve as an aesthetic reminder that clean, minimal setups help reduce visual clutter and improve focus during long gaming sessions.
Fine‑Tune Sensitivity and Polling to Lock in Sensor Accuracy
Even after you’ve set the lift‑off distance and disabled smoothing, the sensor’s true precision still depends on how you fine‑tune sensitivity and polling. Enable RAW input so Windows acceleration won’t corrupt movement data, then lock DPI to a low‑mid range (400–800) for steady 1:1 movement. Pair that with a 1000 Hz polling rate; the faster cycle cuts jitter and preserves sensor accuracy. Use MouseTester to confirm the polling rate stays within ±1 % at 1000 Hz, and run a surface recalibration after any lift‑off distance adjustment. Finally, double‑check that acceleration is off and pointer speed sits at a neutral level. Integrated charging station can influence how you route cables and keep your desk clutter‑free, potentially affecting consistent tracking if cables introduce resistance or movement artifacts.
- Set RAW input and disable acceleration.
- Choose DPI 400‑800 for precision.
- Verify 1000 Hz polling with MouseTester.
- Perform surface recalibration and re‑measure lift‑off distance.
Frequently Asked Questions
How to Fix an Inaccurate Mouse Sensor?
You clean the lens with compressed air and a microfiber wipe, recalibrate via the software, set a low lift‑off distance, disable smoothing, then test CPI and polling until deviation stays under five percent.
How to Make a Mouse Sensor Stronger?
You boost a mouse sensor by cleaning it, calibrating on a uniform pad, updating firmware, enabling RAW input, disabling software smoothing, and tweaking DPI settings to match your grip and surface.
How to Improve Mouse Pointing Accuracy?
You boost accuracy by enabling RAW input, keeping LOD low, cleaning the sensor, using a consistent pad, verifying stable CPI and 1000 Hz polling, and training daily with flick and tracking drills.
Do Mouse Sensors Degrade Over Time?
Yes, mouse sensors degrade over time; dust, wear, and skate damage increase CPI drift and jitter. Cleaning, re‑calibrating, and updating firmware usually restore accuracy, but occasional hardware replacement may be necessary.
In Summary
By keeping the lens clean, calibrating on a uniform surface, testing across DPI and polling settings, tweaking lift‑off distance, and fine‑tuning sensitivity, you’ll lock in peak sensor accuracy. These steps assure smooth, precise tracking and restore your gaming mouse’s performance, letting you stay competitive without worrying about drift or lag. Stick to the routine, and your mouse will stay reliable session after session.
Leave a Reply