Lay out every component, match each piece to the assembly guide, and snap photos of anything missing before you start. Check the base and wheels for secure fit, then verify the gas‑lift box for lifts, covers, and screws. Install the gas lift, side covers, and left‑side tilt mechanism in the order listed, tightening by hand first and finishing with a screwdriver. Test the recline lever, and if parts are absent, document them and contact the manufacturer for replacements—continue for detailed troubleshooting steps.
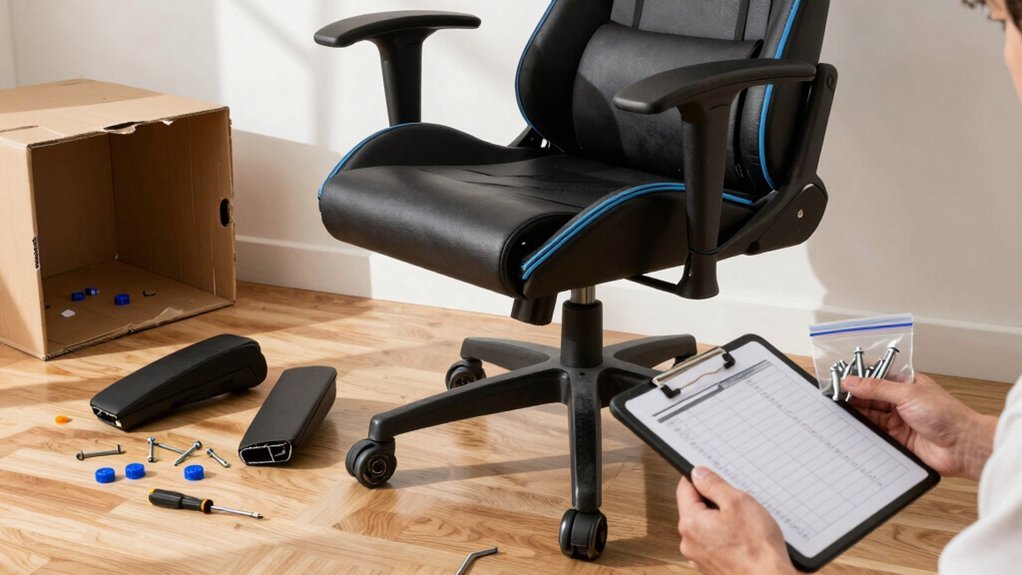
Spot Missing Parts in the Box
Where are the pieces you need? You open the box, scan every compartment, and compare each item to your parts inventory list. Spot the gas lift, lift cover, large screws, and side covers tucked in a separate gas‑lift box. Verify the tilt bracket, sockets, and tiny screws for the left‑side tilt mechanism are present. Check that the backrest and armrest kits include the correct small screws and covers; missing bite‑sized pieces will halt progress. Use your phone to snap a photo and post it on social media if you suspect a shortage, so the seller can respond quickly. By cross‑referencing the assembly guide—like the AN E Sports WB8 One‑for‑One—you’ll catch any absent components before you start building. This prevents delays and ensures a secure, finished chair. Screw compatibility can also influence how smoothly the assembly proceeds, especially when mixing parts from different boxes.
Check the Chair Base and Wheels Before You Start
Make sure the wheels snap securely into the base sockets and that the base sits level and undamaged. Look for any missing caps or covers that should snap on after the wheels are installed. If a wheel won’t seat fully, check the alignment of the socket and stem before forcing anything. Maintain proper humidity levels during setup to protect plastic components from warping and ensure long-term stability of the chair parts 40-50% humidity.
Verify Wheels Fit
First, make sure each wheel slides straight into the base and sits flush without wobble; if a wheel resists, rotate it and try again until the stem aligns perfectly with the socket. Push each wheel in firmly, feeling for a solid click that indicates proper seating. Count the wheels to verify the base matches the model’s required number; missing or extra sockets signal a problem. Inspect the stems for bends or debris that could block insertion, and clear any obstructions. Confirm that every wheel adapter or cover is present; a missing piece can weaken stability and may need a replacement. After all wheels are secured, give the base a gentle rock. If it stays steady, you’ve verified the wheels fit correctly and can move on to the next assembly step. Remember to check the non-slip surfaces or rubber grips on the base to ensure stability on your flooring wheel stability.
Inspect Base Integrity
Now that the wheels are seated and click into place, turn your attention to the base itself. Feel the frame for any wobble, cracks, or loose joints. Push each wheel firmly into its socket and spin it; a smooth, even rotation means the fit is secure. Align the base with the gas‑lift column, confirming the central hole is clear and sized correctly. Inspect the base for missing or damaged screws, caps, and the tilt‑mechanism fasteners. If anything feels unstable or a wheel is absent, stop and contact the seller for a replacement before you continue. Best Monitor Integration As you proceed, consider how a compatible prompter setup can help you maintain focus on the game and on-screen commentary, ensuring a steady, professional presentation.
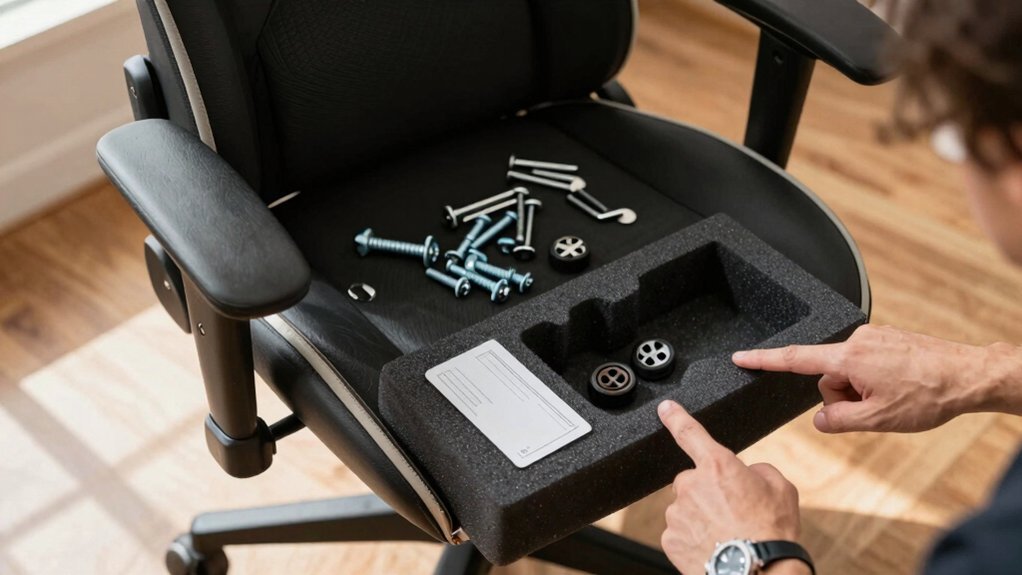
Confirm All Parts Present
Where are all the components you need? First, lay the base on a clean floor and count the wheels—four should be present and snugly slot into the circular holes.
Next, open the gas‑lift box and verify the lift cover, gas cylinder, large screws, and side covers are all inside; these parts enable height adjustment and tilt.
Then, inspect the tilt mechanism and its accompanying screws, making sure they match the left‑side seat diagram.
Grab a screwdriver and confirm it’s the right size for the hand‑tightening steps that follow.
If any wheel, screw, or cover is missing, pause and order the replacement from the manufacturer or contact support before you continue. This quick audit prevents delays and ensures a safe, stable assembly. Also, consider verifying the base and wheels for any settlement or looseness after initial assembly to maintain long-term stability under-desk compatibility.
Verify the Gas‑Lift Package for Missing Items
Wondering whether your gas‑lift kit is complete before you start? Open the box and lay out each piece: the lift cover, the gas lift cylinder, the large screws, and the side covers. Check the left side of the seat for the tilt‑mechanism sockets and screws; they should be present and undamaged. If anything is missing, stop the build and contact the seller or manufacturer for a replacement kit—don’t gamble with safety. Keep the components organized as you verify them, matching each item to the assembly checklist. Only when every listed part is accounted for should you move on, ensuring the chair will stay stable and operate correctly. Properly storing the verified parts helps prevent missing‑part issues in future repairs and maintenance gas‑lift components.
Install the Gaming Chair Gas Lift and Side Covers Securely
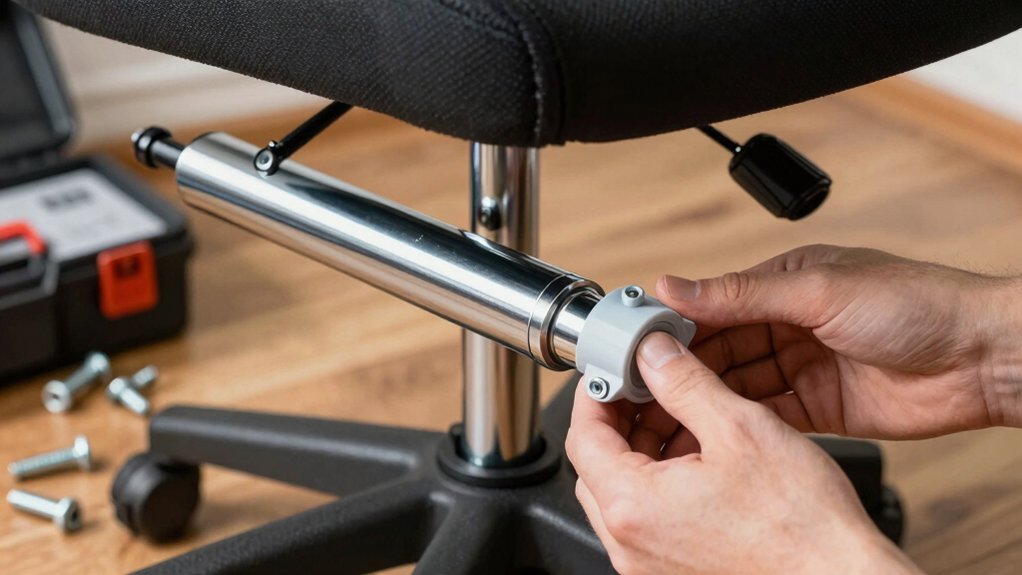
Ready to lock everything in place? First, unbox the gas‑lift package and pull out the lift, its cover, the large screws, and the side covers.
Slide the gas lift into the chair base, keeping the cover over the opening, then drive the large screws through the base holes until they’re snug.
Next, position the side covers over the exposed lift area. Align the small‑screw holes and tighten each screw by hand, then finish with a screwdriver for a firm, double‑tight fit.
Double‑check that the cover sits flush and the side covers sit evenly on both sides.
With all screws tightened, the lift and covers stay secure, giving the chair a clean, finished look ready for the next assembly step.
Also, verify the drive-type and compatibility notes when selecting parts to ensure a stable installation and lasting performance. drive-type compatibility
Attach the Tilt Mechanism on the Left Side Correctly
After securing the gas lift and side covers, line up the left‑side tilt mechanism with the seat’s mounting holes. Make sure each hole aligns perfectly with its socket before you insert any screws. Hand‑tighten the screws first to catch any mis‑threads, then grab a screwdriver and turn them until they feel snug. Check that the mechanism sits flush against the seat; any wobble means a screw is loose or mis‑aligned. If a screw or bracket is missing, swap one from a similar chair or contact the seller for the exact part. Verify the tilt assembly is firmly attached before you move on to the backrest or armrests, ensuring a stable, comfortable chair.
Tighten All Screws “Double‑Tight” for Safety and Comfort

Start by tightening each screw with your hand to seat the threads, then give it a firm turn with a screwdriver to lock it in place.
Make sure you repeat this “double‑tight” step for every screw, especially on the tilt mechanism and adjustable armrests.
Periodically check for any wobble and re‑tighten as needed before you use the chair.
Secure Screws With Hand
Need you tighten the tilt‑mechanism screws by hand first, establishing a solid baseline before you reach for the screwdriver. Grasp each screw, turn it clockwise until you feel resistance, and make sure it’s snug but not stripped. This manual step aligns the threads and prevents wobble when you later apply torque.
When you attach the adjustable armrests, repeat the same hand‑tightening routine; it keeps the brackets from shifting under load.
For the backrest, press the connection points together, then hand‑tighten the surrounding screws to lock the alignment.
If any screw feels a little loose after the chair’s been used, go back in the original installation order and hand‑tighten it again, ensuring uniform clamping force throughout the frame.
Double‑Check Tightness With Screwdriver
Where can you find the greatest safety boost? Grab your screwdriver and go over every screw you’ve already hand‑tightened. Start with the tilt mechanism, turning each bolt just enough to feel firm—no wobble. Then move to the armrests, backrest, gas‑lift column, base connections, and side covers. Give each fastener a “double‑tight” twist; you should hear a subtle click as the threads seat fully. After you’ve seated the chair, sit in it for a few minutes, then re‑torque all screws. This final pass catches any settling that occurs during early use, ensuring the chair stays stable, wobble‑free, and safe for long gaming sessions.
Mount Adjustable Armrests and Ensure Proper Alignment
Ever wondered how to lock those adjustable armrests in place without a wobble? First, hand‑tighten each screw until you feel resistance, then grab a screwdriver and finish tightening until the armrest feels solid against the seat bracket. Make sure the armrest’s holes line up perfectly with the mounting holes so it can slide laterally for width tweaks without shifting out of place. After the initial tighten, give every screw a “double‑tight” pass to eliminate any play. If you notice misalignment, loosen the screws just enough to reposition, then retighten in the same order. Finally, test the sliding motion and lock the armrest in your preferred spot; it should stay put and feel comfortable during use.
Adjust Armrest Height and Width After Installation
How do you fine‑tune your armrests for perfect ergonomics? First, tighten the adjustment screws by hand, then finish with a screwdriver to lock height and width. To set height, raise or lower the arms until they sit at elbow level when you’re seated, applying gentle pressure to avoid over‑tightening. For width, loosen the side screws just enough to slide the arms inward or outward, then re‑tighten both screws firmly. If anything feels loose, recheck the upper and lower mounting screws and tighten them in a diagonal pattern to eliminate wobble. Test several positions by moving your arms while typing or gaming, ensuring natural forearm alignment.
| Step | Action | Tool |
|---|---|---|
| 1 | Hand‑tighten screws | Hand |
| 2 | Finish with screwdriver | Screwdriver |
| 3 | Diagonal tighten for stability | Screwdriver |
Secure the Backrest to the Seat Using Alignment Pins
After tightening the armrest screws, line up the backrest with the seat and insert the alignment pins until they sit fully in the pre‑drilled holes. Make sure each pin goes straight; an angled insertion will misalign the backrest and weaken the joint. If any pin is missing, swap it for a compatible one that fits the seat’s holes to keep the structure sound.
Once all pins are seated, grab the supplied screws and a screwdriver, then tighten the attachment points firmly but without over‑torquing. After you’ve secured everything, give the backrest a gentle push to test its stability. It should stay rigid during normal reclining, confirming a solid connection before you move on.
Snap the Side Cover in Place for a Polished Look
Make sure the cover edges line up perfectly with the backrest and seat before you press it in. Then, use the tiny screw that came with the cover to lock it snugly, tightening it only after the main components are in place. Finally, give the assembly a quick visual check for any gaps and adjust the torque if needed.
Align Cover Edges
Where do you start? Align the side backrest cover with the chair’s frame, matching the edge notches precisely. Snap the cover into place, then press along the entire edge to verify a firm, seamless fit. If a gap appears, reposition the cover slightly and re‑snap until the edges sit flush against the frame. Check both sides to ensure the decorative edge lines up evenly along the seat‑and‑backrest junction. Once the cover feels solid, you’ve achieved a polished look without visible gaps or misalignment. This careful alignment sets the stage for the next step, guaranteeing the chair’s aesthetics and structural integrity before you secure it with the small screw.
Secure With Small Screw
Ready to lock the side backrest cover in place?
First, snap the cover onto the frame, making sure the tilt‑mechanism area is clear of any obstruction. The cover should click firmly, aligning its hole with the screw recess.
Grab a small screw that matches the original thread size and length. Hand‑tighten it just enough to hold the cover, then finish with a screwdriver, turning gently to avoid stripping the plastic or metal insert.
Check that the cover sits flush with the chair frame, with no visible edges or gaps.
If you’re missing a screw, substitute an identical one to keep the attachment secure and the look polished. This step locks the side cover and hides internal hardware.
Check For Gaps
Ever notice a tiny gap where the side backrest cover meets the frame? First, pull the side cover onto the frame, aligning it with the mounting sockets before you tighten any screws. If it refuses to snap, check the tilt mechanism and nearby parts for mis‑alignment or obstruction. Once the cover clicks into place, use a screwdriver to gently secure the small screw—don’t over‑tighten, or the plastic may crack. Finally, run your hand along the edge; the cover should sit flush, leaving no gaps that could gather dust or snag clothing.
| Step | What to Do |
|---|---|
| 1 | Align cover with sockets |
| 2 | Snap into place |
| 3 | Secure screw lightly |
Align the Gaming Chair Base and Seat Using the Gas Lift
How do you guarantee the chair sits perfectly? Start by placing the five‑legged base on the floor and line up the gas‑lift tube so the connection stays straight. Insert the gas lift into the base first, then slide the lift cover over it before you attach the seat—this prevents any misalignment. With the lift partially in, raise or lower the seat until the peg on the seat meets the lift’s top interface, securing a firm fit. Finally, tighten any side covers or tilt‑mechanism parts to keep everything steady and wobble‑free.
- Align base and tube before insertion.
- Insert lift, then cover before seating.
- Verify peg‑to‑interface contact and tighten side components.
Test the Recline Lever Before First Use
Wondering if your recline lever works correctly before you sit down? Pull it slowly and feel the backrest glide into each angle. Make sure the motion is smooth, without sticking or slipping, and that the lever locks firmly in the upright position. While seated, test the full range, then stand and pull again to sense resistance and confirm the mechanism moves freely. If any components are missing, first tighten every visible screw and secure all covers around the tilt assembly; this prevents wobble during the test. Return the lever to its original spot and verify the chair snaps back to an active seating posture instantly, ensuring it won’t stay reclined unintentionally. This quick check guarantees safe, comfortable use right out of the box.
Troubleshoot Missing‑Part Issues and Report Them to the Manufacturer
If you discover that parts are missing, start by matching every item in the box to the parts list in the manual, noting exactly which components are absent. Then photograph the packaging, labels, and any visible hardware, and keep the receipt and order number handy. Contact the manufacturer’s support with those photos, the model number (e.g., AN E Sports WB8 One for One), and the purchase date (3rd February). Request a replacement or partial shipment, and record the ticket number. If response stalls, use official escalation channels or a consumer‑protection agency, preserving all correspondence.
- Verify inventory against the manual.
- Document with clear photos and receipts.
- Escalate promptly if the manufacturer delays.
Frequently Asked Questions
Are Gaming Chairs Hard to Put Together?
Yes, you’ll find it manageable if you follow the step‑by‑step guide, double‑check each component, and tighten screws carefully; missing parts may slow you, but you can still assemble it successfully.
How to Separate Chair Cylinder From Base?
You flip the chair upside‑down, press the wheels inward to expose the base plate, then pull the gas‑lift cylinder straight up while keeping even pressure on the seat and base.
How to Assemble the Chair?
Start by inserting the wheels into the base, then attach the gas lift and side covers, tighten the tilt mechanism left‑side, secure armrests, connect the backrest, and finally align the seat with the base.
Can Gaming Chairs Be Disassembled?
Yes, you can disassemble most gaming chairs; they’re built with modular parts—base, gas lift, backrest, armrests, and seat—so you can detach each component for transport, repair, or upgrade.
In Summary
Now you’ve double‑checked every component, fitted the gas lift, secured the side covers, and aligned the base, you’re ready to sit back and enjoy. Give the recline lever a quick test, and if anything’s still missing, contact the manufacturer right away. With all parts in place, your gaming chair will be sturdy, comfortable, and ready for countless gaming sessions.


Leave a Reply